How to Connect GoPro to Your iPhone
GoPro has long been one of the most popular brands in action cameras. With its powerful specifications and durable build, it is the perfect companion for outdoor enthusiasts who want to capture and share their adventures with the world. But did you know that you can also connect your GoPro to your iPhone? Here’s how:
Step 1: Download the GoPro App
The first thing you need to do is download the GoPro app on your iPhone from the App Store. The app is free to download and available for both iOS and Android devices.
Step 2: Turn on Wi-Fi on Your GoPro
Next, turn on Wi-Fi on your GoPro by pressing the Wi-Fi button located at the side of the camera. The button looks like a small rectangle with a curved line on top.
Step 3: Connect your iPhone to your GoPro’s Wi-Fi
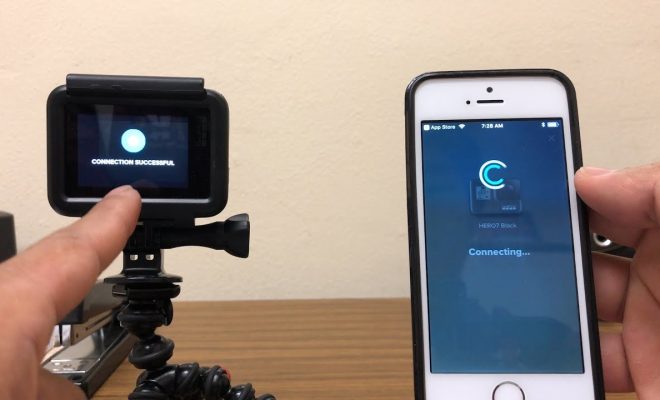
Once Wi-Fi is turned on your GoPro, it will display a blue light indicating that the Wi-Fi is active. Now, go to your iPhone’s Wi-Fi settings and look for the Wi-Fi network that starts with “GOPRO”. Select this network to connect your iPhone to your GoPro’s Wi-Fi.
Step 4: Launch the GoPro App on Your iPhone
Once you’ve connected your iPhone to your GoPro’s Wi-Fi network, launch the GoPro app. The app will automatically recognize your camera and display a live preview of what your GoPro is seeing.
Step 5: Control your GoPro using your iPhone
With your GoPro connected to your iPhone, you can now control your camera from your phone. You can change the camera settings, start and stop recording, download and share photos and videos, and much more.
Conclusion:
Connecting your GoPro to your iPhone is a simple process that can be done in just a few minutes. Once connected, you can do so much more to control and manage your camera. From changing settings to capturing epic moments, your iPhone and GoPro make a great team. So, don’t wait any longer, connect your GoPro to your iPhone and make your adventures unforgettable.