The Tech Edvocate

Top Menu

  • Advertisement
  • Apps
  • Home Page
  • Home Page Five (No Sidebar)
  • Home Page Four
  • Home Page Three
  • Home Page Two
  • Home Tech2
  • Icons [No Sidebar]
  • Left Sidbear Page
  • Lynch Educational Consulting
  • My Account
  • My Speaking Page
  • Newsletter Sign Up Confirmation
  • Newsletter Unsubscription
  • Our Brands
  • Page Example
  • Privacy Policy
  • Protected Content
  • Register
  • Request a Product Review
  • Shop
  • Shortcodes Examples
  • Signup
  • Start Here
    • Governance
    • Careers
    • Contact Us
  • Terms and Conditions
  • The Edvocate
  • The Tech Edvocate Product Guide
  • Topics
  • Write For Us
  • Advertise

Main Menu

  • Start Here
    • Our Brands
    • Governance
      • Lynch Educational Consulting, LLC.
      • Dr. Lynch’s Personal Website
      • Careers
    • Write For Us
    • The Tech Edvocate Product Guide
    • Contact Us
    • Books
    • Edupedia
    • Post a Job
    • The Edvocate Podcast
    • Terms and Conditions
    • Privacy Policy
  • Topics
    • Assistive Technology
    • Child Development Tech
    • Early Childhood & K-12 EdTech
    • EdTech Futures
    • EdTech News
    • EdTech Policy & Reform
    • EdTech Startups & Businesses
    • Higher Education EdTech
    • Online Learning & eLearning
    • Parent & Family Tech
    • Personalized Learning
    • Product Reviews
  • Advertise
  • Tech Edvocate Awards
  • The Edvocate
  • Pedagogue
  • School Ratings

logo

The Tech Edvocate

  • Start Here
    • Our Brands
    • Governance
      • Lynch Educational Consulting, LLC.
      • Dr. Lynch’s Personal Website
        • My Speaking Page
      • Careers
    • Write For Us
    • The Tech Edvocate Product Guide
    • Contact Us
    • Books
    • Edupedia
    • Post a Job
    • The Edvocate Podcast
    • Terms and Conditions
    • Privacy Policy
  • Topics
    • Assistive Technology
    • Child Development Tech
    • Early Childhood & K-12 EdTech
    • EdTech Futures
    • EdTech News
    • EdTech Policy & Reform
    • EdTech Startups & Businesses
    • Higher Education EdTech
    • Online Learning & eLearning
    • Parent & Family Tech
    • Personalized Learning
    • Product Reviews
  • Advertise
  • Tech Edvocate Awards
  • The Edvocate
  • Pedagogue
  • School Ratings
  • Study: Nearly all personal care and cleaning products contain undisclosed chemicals

  • This One AI Wearable Feature Is Quietly Erasing Public Privacy

  • Brutal: Over 200,000 Tech Layoffs in 2026 as AI’s Long Reset Unfolds

  • The Radical Proposal: Why Palantir’s Alex Karp Wants AI Labs Nationalized

  • Heartbreaking: Hyper Light Drifter Studio Nearly Wiped Out After Publisher Abandons Deal

  • Unbelievable: Kojima’s Physint Jumps to Xbox – The September 2026 Big Game Reveals Just Got Wild!

  • This Crucial AI Development Could Trigger Global Chaos

  • Infuriating: Viral Video Exposes Ugly Truth of Racial Slurs in Schools

Assistive Technology
Home›Assistive Technology›How to Build Your Own Raspberry Pi KVM

How to Build Your Own Raspberry Pi KVM
By Matthew Lynch
June 12, 2023
0
Spread the love

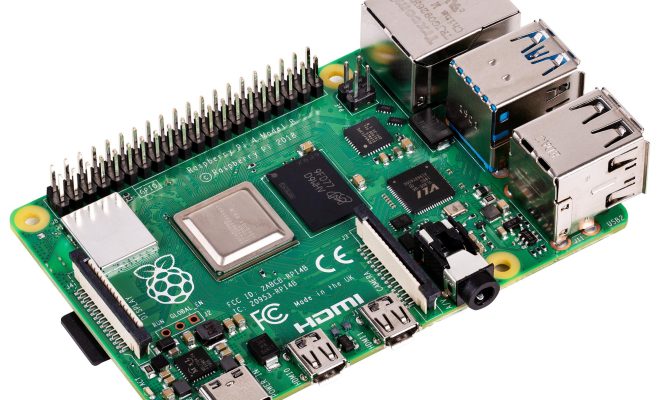
KVM (Keyboard, Video, Mouse) switches are commonly used in data centers and server rooms to manage multiple servers on a single console. If you want to build your own KVM switch, you can use a Raspberry Pi board and some additional hardware components. With some basic knowledge about Raspberry Pi and electronic circuits, you can create a functional KVM switch that allows you to control multiple computers without a separate display, keyboard or mouse.

Here is a guide on how to build your own Raspberry Pi-based KVM switch:

1. Get the hardware components

To build a Raspberry Pi KVM switch, you need the following hardware components:

– Raspberry Pi board (preferably Raspberry Pi 4 or 3B+)
– HDMI splitter (a device that can take a single HDMI input and split it into multiple outputs)
– USB hub (to connect multiple USB devices)
– HDMI cables (to connect the splitter and the devices)
– USB cables (to connect the hub and the devices)
– Two push buttons (to switch between the computers)

2. Set up the Raspberry Pi

Before you connect the hardware, you need to set up the Raspberry Pi. Install the latest Raspbian OS on the Pi, and configure it for remote control using VNC or SSH. You also need to install some additional software packages that are necessary for the KVM switch operation, such as the x11vnc server for video access and the uinput driver for emulating the keyboard and mouse. You can use the Raspberry Pi’s GPIO pins to connect the push buttons, which will be used to switch between the connected computers.

3. Connect the hardware

Once the Raspberry Pi is set up, you can connect the hardware components. Use an HDMI splitter to split the video input from the computers into multiple HDMI outputs, and connect them to the splitter. Connect the USB hub to the Raspberry Pi and connect the keyboard and mouse to the USB hub. Connect the push buttons to the GPIO pins of the Raspberry Pi.

4. Configure the software

Once you have connected the hardware, you need to configure the software to make the KVM switch work. Use the x11vnc server to share the video output of the connected computers, and use the uinput driver to emulate the keyboard and mouse. You also need to write a script that listens to the push buttons and switches the video and input control accordingly. This script should be configured to run as a service, so that it starts automatically when the Raspberry Pi boots up.

5. Test and use the KVM switch

After configuring the software, you can test the KVM switch by connecting multiple computers to the HDMI splitter and the USB hub, and using the push buttons to switch between them. The switch should be able to capture the video output from the computers and the input from the keyboard and mouse, and switch between them seamlessly. You can also configure the Raspberry Pi to provide remote access to the connected computers, which will enable you to manage them from anywhere using your Raspberry Pi KVM switch.

In conclusion, building a Raspberry Pi-based KVM switch is a fun and educational project that can help you learn about the Raspberry Pi, circuits, and software development. With a few basic components and some knowledge, you can create a functional KVM switch that can help you manage your computers more efficiently and conveniently.

Previous Article

How to Group Rows and Columns With ...

Next Article

How to Use Google Home Alarm Clock ...

Matthew Lynch

Related articles More from author

  • Assistive Technology

    Ways to Open the Resource Monitor in Windows 11

    June 1, 2024
    By Matthew Lynch
  • Assistive Technology

    Is Your Windows Update Stuck at 100%? Here Are 6 Fixes

    June 23, 2023
    By Matthew Lynch
  • Assistive Technology

    How to Customize Sounds on Windows 10 (And Where to Download Them)

    June 6, 2023
    By Matthew Lynch
  • Assistive TechnologyDigital & Mobile Technology

    How to Fix No Sound in Spotify on a Windows PC

    June 10, 2023
    By Matthew Lynch
  • Assistive Technology

    The Problem With NCH Software: What to Know and How to Remove It

    June 22, 2023
    By Matthew Lynch
  • Assistive Technology

    How to Delete Comments in Word

    June 10, 2023
    By Matthew Lynch

Search

Login & Registration

  • Log in
  • Entries feed
  • Comments feed
  • WordPress.org

Newsletter

Signup for The Tech Edvocate Newsletter and have the latest in EdTech news and opinion delivered to your email address!

About Us

Since technology is not going anywhere and does more good than harm, adapting is the best course of action. That is where The Tech Edvocate comes in. We plan to cover the PreK-12 and Higher Education EdTech sectors and provide our readers with the latest news and opinion on the subject. From time to time, I will invite other voices to weigh in on important issues in EdTech. We hope to provide a well-rounded, multi-faceted look at the past, present, the future of EdTech in the US and internationally.

We started this journey back in June 2016, and we plan to continue it for many more years to come. I hope that you will join us in this discussion of the past, present and future of EdTech and lend your own insight to the issues that are discussed.

Newsletter

Signup for The Tech Edvocate Newsletter and have the latest in EdTech news and opinion delivered to your email address!

Contact Us

The Tech Edvocate
910 Goddin Street
Richmond, VA 23231
(601) 630-5238
[email protected]

Copyright © 2026 Matthew Lynch. All rights reserved.