How to Adjust a Garage Door Spring

Introduction
Adjusting a garage door spring can be a crucial, yet tricky task. For those who do it right, it can save them significant time and money. In this article, we will walk you through the step-by-step process of safely and effectively adjusting your garage door spring.
Note: Garage door spring adjustment can be dangerous if not done properly and using the right tools. If you’re not comfortable with the task or have doubts about your ability to accomplish it, please call a professional.
Step-by-Step Guide to Adjust a Garage Door Spring
1. Gather Necessary Tools
To adjust a garage door spring, you’ll need a few essential tools:
– C-clamps or locking pliers
– Safety goggles
– Work gloves
– A ladder or step stool
– Winding bars (properly sized)
– A wrench (appropriate size for your garage door system)
2. Prepare for Safety
Before starting any work on your garage door springs, ensure the following safety measures are in place:
– Unplug the garage door opener.
– Use C-clamps or locking pliers to secure the door in place, preventing it from falling or an unexpected lift.
– Put on safety goggles and work gloves to protect yourself from injuries.
3. Locate the Torsion Spring(s)
Climb up your ladder and locate your torsion spring(s). They are usually located horizontally above the garage door opening.
4. Identify the Type of Spring System
There are two primary types of torsion spring systems – single torsion spring and double torsion spring systems.
5. Determine Direction of Tightening
For single-spring systems, if the cable drum’s set screw is located next to the wall on the left side, you’ll tighten the spring by turning it clockwise (right-hand winding). If it’s on the right side, you’ll turn counterclockwise (left-hand winding).
For double-spring systems, follow the same logic. Usually, one spring has a left-hand winding, and the other has a right-hand winding.
6. Adjust the Torsion Spring
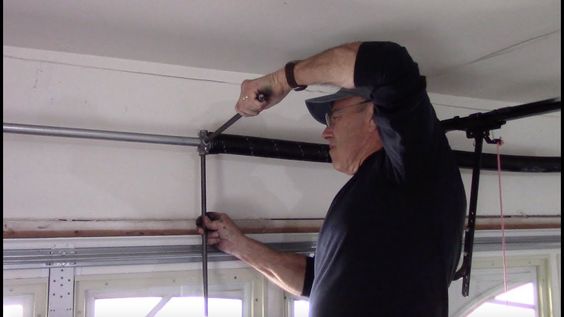
Place the winding bars into the winding cone holes of the torsion spring. Make sure they are securely in place. Use the wrench to loosen the set screws on the winding cone.
To tighten the spring, turn it in the direction mentioned earlier according to your system. Each quarter-turn equates to a half pound of lift force.
When adjustment is complete according to the force needed for your garage door, hold one winding bar securely in place and tighten the set screws on the winding cone using your wrench.
7. Test
Carefully remove C-clamps or locking pliers and test your door operation. If necessary, repeat steps 6 and 7 until you achieve proper balance and desired tension.
Conclusion
Adjusting a garage door spring can be daunting for some people, but with proper knowledge, tools, and precautions, it can be accomplished safely. Remember that if at any point you feel doubtful about your skills or safety while performing this task, consult a professional technician or expert for assistance.


