How to Address Clasp Envelopes: 12 Steps
Clasp envelopes are a practical and efficient solution for mailing documents that require additional security and durability. These envelopes typically feature a reinforced eyelet, a sturdy metal clasp, and gummed adhesive for secure closure. Whether you’re sending important business documents or personal letters, it’s essential to address clasp envelopes properly to ensure they reach their intended destination.
Follow these 12 steps to address a clasp envelope accurately and professionally:
1. Gather the necessary materials: Obtain the clasp envelope you’d like to use, a pen or marker with permanent ink, and your recipient’s correct mailing address.
2. Lay down the envelope: Place the envelope on a flat surface with the flap side up and the clasp located on your right-hand side.
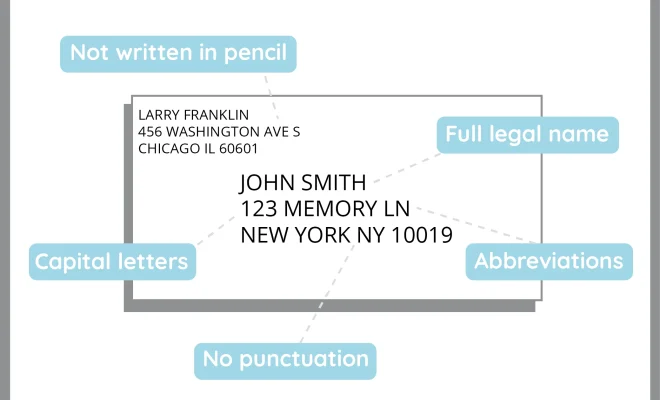
3. Write the recipient’s name: In the center of the envelope, clearly write down the recipient’s full name or the name of the recipient’s company.
4. Write the recipient’s street address: On the next line below their name, include their full street address. Use abbreviations such as “Apt” for “Apartment” and “St” for “Street,” if applicable.
5. Write the recipient’s city, state, and postal code: On the following line, provide their city, followed by a comma, then their state abbreviation, a space, and finally their postal code.
6. Include additional information (optional): Depending on your specific requirements, you might also want to add relevant details such as suite numbers or department names on an additional line above or below their street address.
7. Write your return address: In the top-left corner of the envelope front side, write your full name or company name along with your complete mailing address using similar formatting as outlined in steps 3-5.
8. Apply postage: In the top-right corner of the envelope front side, affix the appropriate postage. To ensure accuracy, you can check with your local postal service for current rates and requirements.
9. Fold and insert contents: Ensure your documents or materials are neatly folded and placed into the envelope with any fragile or important items toward the center.
10. Fold down the flap: Close the envelope by folding down the large flap, without sealing it just yet.
11. Secure the clasp: Open the metal clasp on the right side of the envelope, slip the small hole over the circular metal piece, and press down to secure it in place.
12. Seal with gummed adhesive (optional): For added security, you can dampen the gummed adhesive strip under the flap and press it firmly against the envelope body once you have securely fastened the clasp.
These 12 steps will help ensure that your clasp envelopes are properly addressed and securely closed, making them ready to send off to their intended destination with confidence. Happy mailing!