The Tech Edvocate

Top Menu

  • Advertisement
  • Apps
  • Home Page
  • Home Page Five (No Sidebar)
  • Home Page Four
  • Home Page Three
  • Home Page Two
  • Home Tech2
  • Icons [No Sidebar]
  • Left Sidbear Page
  • Lynch Educational Consulting
  • My Account
  • My Speaking Page
  • Newsletter Sign Up Confirmation
  • Newsletter Unsubscription
  • Our Brands
  • Page Example
  • Privacy Policy
  • Protected Content
  • Register
  • Request a Product Review
  • Shop
  • Shortcodes Examples
  • Signup
  • Start Here
    • Governance
    • Careers
    • Contact Us
  • Terms and Conditions
  • The Edvocate
  • The Tech Edvocate Product Guide
  • Topics
  • Write For Us
  • Advertise

Main Menu

  • Start Here
    • Our Brands
    • Governance
      • Lynch Educational Consulting, LLC.
      • Dr. Lynch’s Personal Website
      • Careers
    • Write For Us
    • The Tech Edvocate Product Guide
    • Contact Us
    • Books
    • Edupedia
    • Post a Job
    • The Edvocate Podcast
    • Terms and Conditions
    • Privacy Policy
  • Topics
    • Assistive Technology
    • Child Development Tech
    • Early Childhood & K-12 EdTech
    • EdTech Futures
    • EdTech News
    • EdTech Policy & Reform
    • EdTech Startups & Businesses
    • Higher Education EdTech
    • Online Learning & eLearning
    • Parent & Family Tech
    • Personalized Learning
    • Product Reviews
  • Advertise
  • Tech Edvocate Awards
  • The Edvocate
  • Pedagogue
  • School Ratings

logo

The Tech Edvocate

  • Start Here
    • Our Brands
    • Governance
      • Lynch Educational Consulting, LLC.
      • Dr. Lynch’s Personal Website
        • My Speaking Page
      • Careers
    • Write For Us
    • The Tech Edvocate Product Guide
    • Contact Us
    • Books
    • Edupedia
    • Post a Job
    • The Edvocate Podcast
    • Terms and Conditions
    • Privacy Policy
  • Topics
    • Assistive Technology
    • Child Development Tech
    • Early Childhood & K-12 EdTech
    • EdTech Futures
    • EdTech News
    • EdTech Policy & Reform
    • EdTech Startups & Businesses
    • Higher Education EdTech
    • Online Learning & eLearning
    • Parent & Family Tech
    • Personalized Learning
    • Product Reviews
  • Advertise
  • Tech Edvocate Awards
  • The Edvocate
  • Pedagogue
  • School Ratings
  • The Future of Artificial Intelligence: Navigating the Next Frontier

  • Best Home Backup Generators for 2026

  • Online Learning Platforms: Transforming Education in the Digital Age

  • Fastest Growing Sectors of the EdTech Market: Exploring Emerging Trends

  • The Best Video Games of All Time

  • What is the Best Gaming Platform on the Market?

  • Midjourney vs OpenArt: A Comprehensive Comparison of AI Art Generators

  • Sora 2: An In-Depth Product Review

  • Product Review of GoGuardian

  • Product Review of TPT (Teachers Pay Teachers)

Digital & Mobile Technology
Home›Digital & Mobile Technology›How to Add Textures in Blender: A Step-by-Step Guide

How to Add Textures in Blender: A Step-by-Step Guide

By Matthew Lynch
June 23, 2023
0
Spread the love

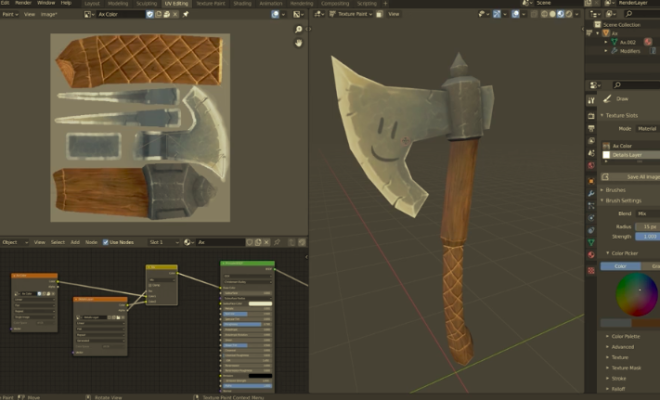
Blender is a powerful 3D software that allows you to create the most stunning digital graphics. Textures give a sense of realism to your models, and it’s crucial to learn how to add them to your projects if you want to make them look even more professional. In this article, we’ll guide you through the steps to create and apply textures in Blender.

Step 1: Create a new project

To start, open Blender and create a new project by clicking on File > New or by using the Ctrl + N shortcut. Once you’re inside the workspace, you need to select the object you want to add the texture to, or if you haven’t created one yet, you can use Blender’s pre-installed shapes.

Step 2: Open the texture editor

Now that you have your object, the next step is to open the Texture Editor. In the Properties tab located on the right side of the screen, select the icon with the rectangle labeled Material Properties. Then, click on the New button located under the Material Slot section. Once you’ve created your material, you will see that the Texture Properties tab has appeared beneath it.

Step 3: Create a new texture

To add a texture, click on the New button located under the Texture Slots section. You now have a new texture, and you can begin to configure it.

Step 4: Choose a texture type

Blender offers multiple texture types that you can use, like Image or Noise. Click on the Type drop-down menu and select the type that best fits your needs.

Step 5: Configure the texture properties

Every texture has several properties you can customize, such as color, brightness, and scale. Depending on the chosen type, you may have more options to customize.

Step 6: Unwrap the object

To apply the texture to the object, you need to unwrap it first. Unwrapping means assigning the object’s surface a specific area on the texture. Go back to the 3D workspace and select the object you’ve been working with. Then, press TAB to enter the Edit mode, select all the faces with A, and use the UV Unwrap tool located in the top menu to unwrap the mesh. Once you’ve unwrapped it, you’ll see the UV map for the object on the left of the workspace.

Step 7: Add the texture to the object

In the Texture Properties tab, set the texture Coordinates option to UV, and select the name of the texture you’ve created previously. You’ll immediately see the texture being applied to the object. If you’re not happy with how it looks, you can tweak the settings until you get the result you want.

Step 8: Fine-Tune the Texture

Remember that you can also tweak the texture in the Shader Editor, where you can add more nodes and modify existing ones. For example, if you’re working with an Image texture, you can use the ColorRamp node to adjust the color range or the Brightness/Contrast nodes to tweak their contrast and brightness.

Previous Article

How to Screen Mirror Windows 11 to ...

Next Article

How to Remove a File from Commit ...

Matthew Lynch

Related articles More from author

  • Digital & Mobile Technology

    What is Standard Generalized Markup Language (SGML)?

    May 12, 2023
    By Matthew Lynch
  • Digital & Mobile Technology

    What is an Automatic Vehicle Locator (AVL)?

    April 25, 2023
    By Matthew Lynch
  • Digital & Mobile Technology

    How to Turn off Facebook Messenger

    June 4, 2023
    By Matthew Lynch
  • Digital & Mobile Technology

    Reasons Why Your Phone Battery Is Draining So Fast

    June 8, 2023
    By Matthew Lynch
  • Digital & Mobile Technology

    How to Soft Reset Your iPhone

    June 22, 2023
    By Matthew Lynch
  • Digital & Mobile Technology

    My Keyboard Won’t Work. Now What?

    June 12, 2023
    By Matthew Lynch

Search

Login & Registration

  • Register
  • Log in
  • Entries feed
  • Comments feed
  • WordPress.org

Newsletter

Signup for The Tech Edvocate Newsletter and have the latest in EdTech news and opinion delivered to your email address!

About Us

Since technology is not going anywhere and does more good than harm, adapting is the best course of action. That is where The Tech Edvocate comes in. We plan to cover the PreK-12 and Higher Education EdTech sectors and provide our readers with the latest news and opinion on the subject. From time to time, I will invite other voices to weigh in on important issues in EdTech. We hope to provide a well-rounded, multi-faceted look at the past, present, the future of EdTech in the US and internationally.

We started this journey back in June 2016, and we plan to continue it for many more years to come. I hope that you will join us in this discussion of the past, present and future of EdTech and lend your own insight to the issues that are discussed.

Newsletter

Signup for The Tech Edvocate Newsletter and have the latest in EdTech news and opinion delivered to your email address!

Contact Us

The Tech Edvocate
910 Goddin Street
Richmond, VA 23231
(601) 630-5238
[email protected]

Copyright © 2025 Matthew Lynch. All rights reserved.