How to make wooden spoon
“`html
Crafting a wooden spoon may seem like a quaint or outdated skill, yet it’s a rewarding endeavor that connects you to a tradition as old as cooking itself. In this guide, we’re diving deep into how to make a wooden spoon, exploring everything from selecting the right wood to finishing touches that give your spoon character and usability. Whether you’re a novice or a seasoned woodworker, this step-by-step approach will inspire you to create something truly unique.
1. Understanding the History of Wooden Spoons
Wooden spoons have a long and storied history that spans cultures and centuries. They are one of the earliest tools used in the culinary world, often handcrafted from locally sourced materials. Ancient civilizations, from the Egyptians to the Romans, utilized wooden utensils not only for their functionality but also for their aesthetic appeal. These spoons were often carved with intricate designs, making them both practical and decorative.
The choice of wood plays a significant role in the spoon’s characteristics. Softwoods like pine are easy to carve but less durable, while hardwoods like maple or cherry offer strength and longevity. Understanding these materials’ historical significance can enhance your appreciation for your creation as you embark on your journey of how to make a wooden spoon.
2. Selecting the Right Wood
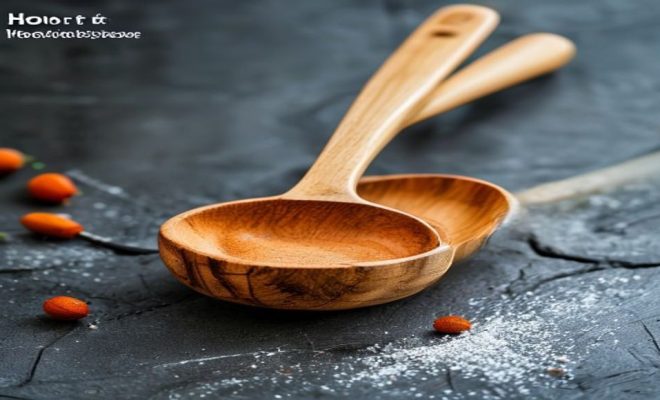
When considering how to make a wooden spoon, your first decision will be the type of wood you want to use. The wood you choose will affect not just the look of your spoon, but also its weight, durability, and feel. Among the most popular woods for spoon-making are maple, cherry, walnut, and birch. Maple is particularly favored due to its fine grain and resistance to bacteria, which makes it a preferred choice for kitchen utensils.
It’s essential to source sustainably harvested wood to ensure you’re respecting the environment. Many local lumberyards offer reclaimed wood options, which can give your spoon a unique character and history. Before purchasing, check for any knots or defects in the wood as these can compromise the strength of your final product.
3. Tools You’ll Need
Equipping yourself with the right tools is crucial when learning how to make a wooden spoon. Here’s a list of essential tools you should gather before starting:
- Carving Knife: A sharp carving knife is essential for shaping the spoon.
- Chisels: Various chisels will help refine details and hollow out the bowl of the spoon.
- Spokeshave: This tool is perfect for smoothing out the curves of your spoon.
- Sanding Tools: Sandpaper of various grits will help in finishing your spoon.
- Clamp or Vise: A sturdy clamp will hold your wood in place while you work.
Investing in quality tools not only improves the quality of your work but also makes the crafting process more enjoyable. Make sure to keep your tools sharp and well-maintained, as this will contribute significantly to your carving efficiency and the end result.
4. Designing Your Spoon
Before you start carving, it’s a good idea to sketch out your design. This can be as simple as a traditional cooking spoon or as elaborate as a decorative piece with intricate designs. You’ll want to consider the spoon’s length, bowl depth, and handle shape. A comfortable handle is critical for usability, especially if you plan to use the spoon regularly. (See: History of wooden spoons.)
Once you have a design in mind, transfer it onto the wood. You can draw directly on the wood with a pencil or create a template to trace. Make sure to account for the size of the final spoon due to the thickness of the wood you are using—remember that carving will remove a significant amount of material!
5. Rough Carving Your Spoon
With your design in place, it’s time to start the rough carving. Using your carving knife, begin to shape the outline of your spoon. Take your time during this process, as rushing can lead to mistakes or injuries. Always carve away from your body, and make small, controlled cuts to ensure the wood responds to your intentions.
Gradually, you’ll start to see the shape of your spoon emerge. Focus on carving the bowl first, as this is typically the most challenging area. Be patient; the rough carving stage is about getting the general shape rather than the final details. Once you’re satisfied with the rough shape, you can move on to refining the spoon.
6. Refining the Shape
Now that you have the rough shape, it’s time to refine it. This step involves using your chisels and spokeshave to add detail and smooth the surface of the spoon. Pay special attention to the bowl of the spoon, ensuring it’s even and comfortable for use. Keep your chisels sharp and make shallow cuts to achieve the best results.
During this stage, you can also start shaping the handle. It should feel comfortable in your hand, providing a good grip. Take breaks to check your progress, and don’t be afraid to adjust your design if something isn’t feeling right. Crafting is as much about intuition as it is about technique.
7. Sanding and Finishing Touches
After you’re satisfied with the shape of your spoon, it’s time to sand it down. Begin with a coarse grit sandpaper and work your way up to a fine grit for a smooth finish. This part of the process is crucial because rough patches can gather bacteria and make your spoon uncomfortable to use. Sanding is also where you can enhance the natural beauty of the wood grain.
Once sanding is complete, consider applying a food-safe finish to protect your spoon. Mineral oil or beeswax are popular choices as they are both safe and effective at preserving the wood. Apply the finish liberally, allowing it to soak in, and buff it with a cloth for a nice shine. This not only adds aesthetic appeal but also extends the life of your handmade spoon.
8. Using and Caring for Your Wooden Spoon
You’ve put in the hard work, and now it’s time to enjoy your creation! Wooden spoons are incredibly versatile and can be used for stirring, serving, and even baking. However, caring for your wooden spoon is essential to ensure its longevity. Always hand wash your spoon with mild soap and warm water, avoiding the dishwasher, as harsh detergents and heat can strip the wood of its natural oils.
Periodically reapply your chosen finish to keep your spoon in top shape. Remember, a well-cared-for wooden spoon can become a cherished kitchen tool that can last for generations. With proper care, not only do you get to enjoy the functionality of your spoon, but you also carry on the legacy of craftsmanship that has been passed down through time.
9. Advanced Techniques for Spoon Carving
Once you’ve mastered the basics of spoon carving, you may want to explore more advanced techniques that can elevate your spoons from simple kitchen tools to true works of art. Here are some techniques that can add greater complexity and beauty to your creations: (See: Wood properties and selection.)
- Decorative Carving: Adding decorative elements like notches or intricate designs can personalize your spoon and make it stand out. Consider integrating patterns that reflect your style or cultural heritage, which can make the spoon even more meaningful.
- Burning Designs: Pyrography, or wood burning, can be used to create stunning designs on the surface of your spoon. This technique requires a specialized tool, but it opens up a world of artistic possibilities.
- Combining Woods: Experimenting with different types of wood can produce visually striking results. You might create a spoon with a handle made from one type of wood and a bowl made from another, offering a beautiful contrast in color and grain.
10. Common Mistakes to Avoid
Even experienced woodworkers can make mistakes, especially when learning how to make a wooden spoon. Here are some common pitfalls to watch out for:
- Ignoring Grain Direction: Always carve in the direction of the wood grain. Carving against the grain can lead to tear-out, resulting in a rough surface that requires more sanding.
- Over-Carving: It can be tempting to remove more wood than necessary, especially when refining the shape. Always start with small cuts and gradually work your way to the desired depth.
- Neglecting Safety: Always prioritize safety while carving. Use a cutting glove, and ensure your work area is well-lit and free from distractions.
11. Choosing the Right Finish for Your Spoon
The finishing stage can significantly affect both the appearance and durability of your wooden spoon. While mineral oil and beeswax are popular choices, there are several other finishes to consider:
- Walnut Oil: This option is a popular choice for wooden kitchen utensils because it’s food-safe and provides a rich, deep color to the wood.
- Linseed Oil: Another natural option, linseed oil hardens when applied, offering a durable finish. Be cautious, as it can take longer to dry than other oils.
- Shellac: Although not as common for utensils, shellac can provide a beautiful finish and is also food-safe if used correctly.
12. Frequently Asked Questions (FAQ)
Q1: What type of wood is best for making wooden spoons?
A: Hardwoods like maple, cherry, and walnut are often recommended for their durability and fine grain. They resist bacteria better than softwoods, making them ideal for kitchen use.
Q2: Can I use a wooden spoon for cooking with acidic foods?
A: Yes, you can use wooden spoons for acidic foods, but it’s essential to ensure they are well-finished and maintained. Avoid leaving them in acidic substances for prolonged periods to prevent damage.
Q3: How do I prevent my wooden spoon from cracking?
A: Proper care is crucial. Always hand wash your spoon, avoid soaking it in water, and ensure you regularly apply food-safe oil to keep the wood hydrated.
Q4: How long does it take to make a wooden spoon?
A: The time it takes can vary depending on your skill level and the design’s complexity. A simple spoon can be made in a few hours, while more intricate designs may take a couple of days.
Q5: Do I need any special skills to make a wooden spoon?
A: No special skills are required, but some basic woodworking knowledge can be beneficial. With practice, most people can learn to make a wooden spoon. (See: Food safety and wooden utensils.)
13. Incorporating Spoon-Carving into Your Lifestyle
Crafting wooden spoons can become more than just a hobby; it can be an integral part of your lifestyle. Many people find that creating something from scratch brings a sense of fulfillment. Here are some ways to incorporate spoon-carving into your daily life:
- Family Activities: Spoon carving can be a fun family project. Gather your kids for a day of carving, teaching them about craftsmanship and creativity.
- Gift-Making: Handmade wooden spoons make for thoughtful gifts. Consider creating personalized spoons for friends and family, especially for weddings or housewarming events.
- Community Workshops: Look for local workshops or classes where you can meet other woodworkers. Sharing skills and experiences can enhance your craft and expand your network.
14. Environmental Considerations in Spoon Making
As we become more conscious of our environmental footprint, it’s important to consider the sustainability of our crafting materials. When selecting wood for your spoon, opt for sustainably harvested or reclaimed wood whenever possible. This not only reduces demand for new lumber but also supports responsible forestry practices, which are crucial for preserving forests and biodiversity.
Using local wood sources reduces the carbon footprint associated with transporting materials. It also allows you to connect with your local environment more meaningfully. Many regions have unique types of wood that can inspire your projects and add a local touch to your creations.
15. Inspiration for Your Spoon Projects
Finding inspiration can sometimes be challenging, especially when you’re looking to create something unique. Here are a few ideas to spark your creativity:
- Nature Motifs: Look to the natural world for inspiration. Leaf patterns, animal shapes, or even the textures of tree bark can be incorporated into your spoon designs.
- Cultural Influences: Research traditional spoon designs from various cultures. Many cultures have rich histories of spoon-making, which can provide you with ideas for shapes and techniques.
- Personal Touches: Infuse your personality into your projects. Consider what hobbies or interests you have that can translate into your spoon designs — whether it’s a love for music, art, or even culinary themes.
16. Sharing Your Spoon Carving Journey
Once you’ve crafted your wooden spoons, think about sharing your journey with others! This can be a rewarding experience that connects you with fellow woodworkers and enthusiasts. Here are some ways to do that:
- Social Media: Document your process on platforms like Instagram or Facebook. Sharing photos and crafting tips not only inspires others but also allows you to receive feedback and support from the community.
- Blogging or Vlogging: If you enjoy writing or creating videos, consider starting a blog or YouTube channel focused on your woodworking projects. You can share tutorials, tips, and even your personal experience with challenges and triumphs.
- Local Craft Fairs: Participate in local craft fairs or markets to showcase your wooden spoons. This is a great way to meet others with similar interests, gain exposure, and potentially sell your creations.
17. Conclusion
In learning how to make a wooden spoon, you’ve engaged in a craft that connects you to history, nature, and your own creativity. Each spoon is unique, telling its own story through the wood’s grain and your carving style. So, grab your tools and start creating — your perfect wooden spoon awaits!
“`
Trending Now
Frequently Asked Questions
What wood is best for making a wooden spoon?
The best woods for making a wooden spoon include maple, cherry, walnut, and birch. Maple is particularly favored for its fine grain and resistance to bacteria, making it a safe choice for kitchen utensils. It's important to select wood that is sustainably harvested to respect the environment.
How do you carve a wooden spoon?
To carve a wooden spoon, start by selecting a suitable piece of wood and sketching your design. Use a carving knife to outline the shape, then gradually remove material to form the bowl and handle. Sand the spoon for a smooth finish and apply a food-safe finish to protect it.
What tools do you need to make a wooden spoon?
Essential tools for making a wooden spoon include a carving knife, a gouge for shaping the bowl, and sandpaper for smoothing the surface. Optional tools like a drawknife or spoke shave can help in refining the shape and details of your spoon.
Can you use softwood to make a wooden spoon?
While you can use softwood like pine to make a wooden spoon, it is less durable compared to hardwoods. Softwoods are easier to carve but may not withstand heavy use in the kitchen. Hardwoods like maple and cherry are recommended for their strength and longevity.
How do you finish a wooden spoon?
To finish a wooden spoon, first sand it smoothly with fine-grit sandpaper. Then, apply a food-safe mineral oil or beeswax to enhance the wood's appearance and protect it from moisture. Allow the finish to soak in and wipe off any excess before use.
What’s your take on this? Share your thoughts in the comments below — we read every one.