How to make cake pops
“`html
Cake pops have taken the dessert world by storm. These delightful treats are not just visually appealing; their delicious flavors and versatility make them a favorite for parties, celebrations, or simply as a sweet indulgence. If you’ve ever wondered how to create your own cake pops at home, you’re in for a treat. In this guide, we’ll walk you through a comprehensive cake pops recipe that covers everything from the ingredients you’ll need to expert tips for perfecting your technique. Let’s get started!
1. Understanding Cake Pops: A Brief History
Cake pops emerged as a popular dessert trend in the early 2000s, primarily thanks to the efforts of baker Bakerella, who showcased the concept on her blog. The idea is simple: take leftover cake, crumble it, mix it with frosting, and mold it into bite-sized balls. Once coated with chocolate or candy melts and placed on a stick, these treats became both a fun snack and a decorative piece at parties.
The versatility of cake pops is one of the reasons behind their rise in popularity. They can be tailored to suit various occasions — from weddings to birthdays and everything in between. With countless flavor combinations and decorating options, cake pops allow bakers of all skill levels to express creativity while satisfying sweet cravings.
2. Gathering Your Ingredients and Tools
Before embarking on your cake pop-making journey, it’s crucial to gather all necessary ingredients and tools. Here’s a rundown of what you’ll need:
- Cake: You can use any cake mix or a homemade cake recipe. Flavors like chocolate, vanilla, or red velvet are popular choices.
- Frosting: Store-bought or homemade frosting works well. Cream cheese, buttercream, or ganache are excellent options.
- Candy Melts or Chocolate: Choose your preferred coating — white, milk, or dark chocolate.
- Sprinkles or Decorations: These add a fun touch and can match the theme of your occasion.
- Tools: You’ll need a mixing bowl, a baking tray, lollipop sticks, and a styrofoam block or a cake pop stand for drying.
Having everything ready before you start will make the process smoother and more enjoyable.
3. Baking the Cake: Tips for Success
The first step in your cake pops recipe is to bake the cake. If you’re using a cake mix, follow the instructions on the box. For a homemade cake, ensure that your batter is evenly mixed to avoid any inconsistencies in texture.
Here’s a pro tip: Allow the cake to cool completely before proceeding. This not only makes it easier to crumble but also ensures that the moisture is retained, providing a better texture in the final product. Once cooled, crumble the cake into fine pieces in a large bowl. You can do this by hand or use a food processor for a finer crumb.
4. Mixing the Cake and Frosting
Once you’ve crumbled the cake, it’s time to mix in the frosting. The amount of frosting you’ll need depends on the amount of cake you have. A good rule of thumb is to start with a ratio of 1 cup of frosting for every 2 cups of crumbled cake. Mix the two until well combined, creating a dough-like consistency.
Be careful not to over-mix. Your goal is to have a mixture that holds together when rolled into balls but isn’t overly wet. If it feels too sticky, add a bit more cake. If it’s too dry, a tablespoon of frosting can help adjust the consistency. (See: Wikipedia page on cake pops.)
5. Shaping Your Cake Pops
Now comes the fun part: shaping your cake pops! Take a small amount of the mixture, about the size of a tablespoon, and roll it into a ball between your palms. Make sure they’re uniform in size for even cooking and coating. Place the shaped balls on a baking tray lined with parchment paper.
Once all your cake pops are shaped, it’s advisable to chill them in the refrigerator for about 30 minutes. This step helps them firm up, making the next steps of coating and decorating easier.
6. Coating the Cake Pops
After chilling, it’s time to dip the cake pops in chocolate or candy melts. Melt your chocolate or candy melts according to the package instructions. If you’re using chocolate, consider adding a tablespoon of vegetable oil to make it thinner for dipping.
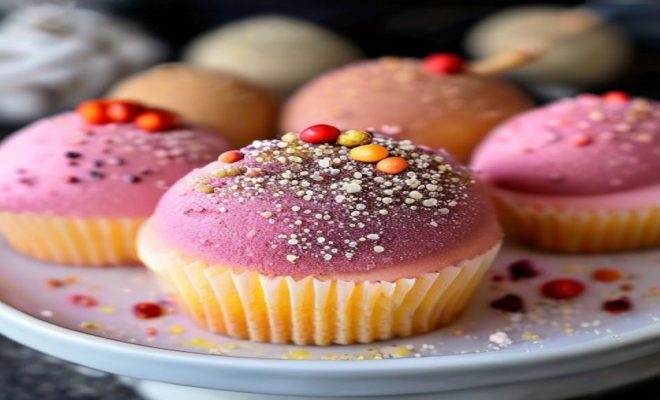
To coat the pops, dip the end of each lollipop stick into the melted chocolate before inserting it into the cake pop. This helps secure the stick. Then, dip the entire pop into the melted coating, ensuring it’s fully covered. Tap gently to remove excess coating, and immediately sprinkle any decorations onto the wet coating.
Another technique that can elevate your cake pops is to use a color drizzle. After the first layer of coating has set, you can use a contrasting color of melted candy melts to create a drizzle effect. This adds an extra layer of visual appeal and can be tailored to fit any theme or celebration.
7. Final Touches and Enjoying Your Cake Pops
After coating, place the cake pops upside down in a styrofoam block or a cake pop stand to allow the coating to set properly. This process typically takes about 30 minutes to an hour. Once set, your cake pops are ready to be enjoyed!
Presentation is key. You can display them in jars, boxes, or on decorative trays, making them a beautiful addition to any event. Whether you’re serving them at a party or gifting them to a friend, these delightful treats are sure to impress!
Making cake pops is not only about following a cake pops recipe; it’s about enjoying the process and getting creative. Feel free to experiment with flavors, colors, and decorations. Each batch can be a new adventure, allowing you to explore your baking skills and create something unique.
8. Popular Cake Pop Variations
While the classic cake pop is a favorite, there are numerous variations that can take your cake pops to the next level. Here are a few popular options: (See: CDC on healthy desserts.)
- Flavor Variations: Don’t just stick to vanilla or chocolate. Try red velvet cake pops with cream cheese frosting, lemon cake pops with a light lemon glaze, or even spice cake pops for a seasonal twist.
- Chocolate Flavors: Experiment with different types of chocolate for coating. You can use dark chocolate, white chocolate, or even flavored chocolates like raspberry or mint.
- Alcohol-Infused Cake Pops: For an adult twist, consider infusing your cake pops with liqueurs like Baileys Irish Cream or Amaretto. Just make sure to reduce the amount of frosting to maintain a good texture.
- Seasonal and Holiday Themes: Tailor your cake pops to the season or holidays. For example, pumpkin spice cake pops for fall, peppermint cake pops for winter, or vibrant colors for summer parties.
9. Frequently Asked Questions (FAQs)
1. What types of cake can I use for cake pops?
You can use any type of cake for cake pops, whether it’s store-bought or homemade. Popular choices include chocolate, vanilla, red velvet, and lemon. Even gluten-free cakes can work well!
2. Can I freeze cake pops?
Yes! Cake pops can be frozen before or after coating. Just be sure to wrap them tightly in plastic wrap and then place them in an airtight container. They typically last up to 3 months in the freezer.
3. How do I store cake pops?
Store cake pops in an airtight container at room temperature for up to a week. If you’ve used cream cheese or perishable frosting, keep them in the fridge and consume them within a few days.
4. Can I use other types of coatings?
Absolutely! While chocolate and candy melts are the most common coatings, you can also use yogurt coating or even a simple glaze made from powdered sugar and milk for a lighter option.
5. Why do my cake pops fall off the stick?
This usually happens if the cake pops are too heavy or if the coating isn’t thick enough. Make sure to let the cake pops chill before coating and insert the sticks securely into each cake ball.
6. How can I decorate my cake pops?
Get creative with decorations! You can use sprinkles, edible glitter, chocolate drizzle, or even crushed nuts. For themed events, consider using colored melts to match your party colors.
7. Can I make cake pops without sticks?
Yes! If you prefer, you can create cake balls instead of cake pops. Simply shape the mixture into small balls and serve them in mini cupcake liners or on a decorative plate.
10. Expert Tips for Perfect Cake Pops
To make your cake pops even better, consider these expert tips: (See: New York Times article on cake pops.)
- Experiment with Textures: Incorporate different textures by adding crushed cookies or nuts to the cake mixture for an interesting crunch.
- Use Quality Ingredients: The flavor of your cake pops heavily relies on the quality of your ingredients. Opt for high-quality chocolate, fresh eggs, and butter for the best results.
- Don’t Rush the Cooling Process: Allow your cake pops to cool thoroughly between steps. This ensures that the coating adheres properly and the pops maintain their shape.
- Practice Makes Perfect: Don’t be discouraged if your first batch doesn’t turn out perfectly. With a little practice, you’ll find the right techniques that work best for you.
11. Creative Cake Pop Ideas for Events
Cake pops can be tailored to fit any event, making them a versatile treat. Consider these creative ideas:
- Bridal Showers: Create elegant cake pops using white chocolate coating and decorate with edible pearls and lace designs.
- Birthday Parties: Make fun, colorful cake pops in the birthday child’s favorite colors and add themed decorations like mini figurines or themed sprinkles.
- Holidays: For Christmas, create cake pops resembling ornaments, and for Halloween, make them look like pumpkins or ghosts.
- Corporate Events: Customize cake pops with your company logo or colors to impress clients and colleagues.
12. Advanced Cake Pop Techniques
If you’re ready to take your cake pop-making skills to the next level, consider these advanced techniques that can elevate your dessert game:
- Marble Cake Pops: Combine two different cake flavors in one pop for a marbled effect. This not only looks stunning but also delivers an exciting flavor experience.
- Layered Cake Pops: Use different colors of cake to create layers within the pops. Simply bake different colored cakes, crumble them separately, and layer them when mixing with frosting.
- Flavor Infusions: Enhance your frosting with flavor extracts, like almond or coconut, to add depth to your cake pops. You could also add dried fruits, nuts, or spices to the cake mixture.
- Textured Coatings: Instead of smooth coatings, consider adding crushed graham crackers, coconut flakes, or even cookie crumbs on top of your chocolate coating for a unique texture.
13. Healthier Cake Pop Alternatives
If you’re looking for a healthier twist on cake pops, consider these alternatives that can keep you on track with your dietary goals while still indulging in a sweet treat:
- Whole Wheat Cake: Substitute regular flour with whole wheat flour to add fiber and nutrients to your cake pops.
- Reduced Sugar Options: Use natural sweeteners like honey or maple syrup instead of granulated sugar to lower the sugar content.
- Fruit-Based Cake Pops: Incorporate pureed fruits like bananas or applesauce into your cake mix for added moisture and sweetness without the extra sugar.
- Dark Chocolate Coating: Choose dark chocolate for coating, as it contains less sugar and offers more antioxidants compared to milk chocolate.
14. Conclusion
Cake pops are more than just a trend; they’re a creative outlet and a delicious treat that can be enjoyed by everyone. With the right cake pops recipe and a little imagination, you can tailor these sweets for any occasion. Whether you choose classic flavors or venture into new territories with unique ingredients, cake pops are guaranteed to be a hit. So, gather your supplies, invite some friends, and start creating your own delightful cake pops today!
15. Additional Resources for Cake Pops Lovers
If you’re eager to learn more about cake pops or want to discover new recipes and decorating techniques, there are plenty of resources available:
- Baking Blogs: Check out popular baking blogs like Bakerella and Sally’s Baking Addiction for unique recipes and tips.
- YouTube Channels: Look for cake pop tutorials on platforms like YouTube where you can watch step-by-step video guides, making it easier to learn new techniques.
- Social Media: Follow hashtags like #CakePops on Instagram or Pinterest to find inspiration from other bakers, including creative designs and flavor combinations.
- Cookbooks: Consider investing in baking cookbooks specifically focused on cake pops or general dessert making for an in-depth look at techniques and recipes.
16. Cake Pops Around the World
Cake pops have transcended borders, inspiring variations and adaptations in different cultures. Here’s a quick look at how other countries have embraced similar concepts:
- Brazil’s Brigadeiros: These chocolate truffles made from condensed milk and cocoa powder can be considered a cousin to cake pops, often rolled in chocolate sprinkles and served at celebrations.
- Italy’s Cake Balls: Known as “tartufi,” these Italian dessert balls are made from leftover cake mixed with liqueurs and rolled in nuts or cocoa powder, showcasing a richer flavor profile.
- Japan’s Mochi Balls: While not exactly cake pops, these rice flour treats can be filled with sweet red bean paste or ice cream and served on sticks, similar in presentation to cake pops.
- United States’ Cookie Dough Pops: This trend takes raw cookie dough, forms it into balls, and covers it in chocolate, creating a fun, no-bake alternative to traditional cake pops.
“`
Trending Now
Frequently Asked Questions
What ingredients do I need to make cake pops?
To make cake pops, you'll need cake (any flavor), frosting (store-bought or homemade), candy melts or chocolate for coating, and sprinkles or decorations for the finishing touch. Essential tools include a mixing bowl and baking sheets.
How do you make cake pops from scratch?
To make cake pops from scratch, bake your cake, crumble it into fine pieces, mix with frosting until combined, shape into balls, and insert sticks. Coat with melted chocolate or candy melts, then decorate as desired.
Can you use leftover cake to make cake pops?
Yes, leftover cake is perfect for making cake pops. Simply crumble the cake, mix it with frosting, and follow the usual steps to shape, coat, and decorate your cake pops.
What is the best way to decorate cake pops?
The best way to decorate cake pops is to first coat them in melted chocolate or candy melts and then add sprinkles, edible glitter, or themed decorations. You can also drizzle contrasting chocolate for an elegant touch.
How long do homemade cake pops last?
Homemade cake pops can last up to a week at room temperature if stored in an airtight container. For longer freshness, consider refrigerating them, which can extend their shelf life to about two weeks.
Agree or disagree? Drop a comment and tell us what you think.