How to Use a Kreg Jig: 11 Steps
A Kreg Jig is an invaluable tool for woodworking enthusiasts and professionals alike. It allows you to create strong, precise, and virtually invisible pocket holes in your woodworking projects with ease. In this article, we’ll outline 11 steps to help you successfully use a Kreg Jig.
Step 1: Gather your materials
Before you begin, gather the necessary materials including the Kreg Jig, a compatible drill, drill bits, a screwdriver, wood screws, wood clamps or any other supporting tool as needed.
Step 2: Choose the right jig model
Select the appropriate Kreg Jig model depending on your project requirements. Popular options include the K3, K4, and K5.
Step 3: Set your project jig size
Adjust the jig size according to the thickness of the wood you’re working with. Consult the manufacturer’s instructions for proper adjustment guidelines.
Step 4: Clamp your workpiece
Secure your wood piece to your workbench using a clamp to ensure it doesn’t move during drilling.
Step 5: Position the jig
Align the jig along the edge of your workpiece where you want to create pocket holes. Ensure that it’s properly secured and positioned over the wood’s edge.
Step 6: Adjust the drill bit depth collar
Use provided depth guide markings to adjust the depth collar on your drill bit based on your project requirements. This ensures that you don’t drill through both sides of your workpiece.
Step 7: Insert drill bit into jig guide hole
Place the drill bit into one of the guide holes in your jig before beginning to drill. The guide hole ensures proper alignment for a clean pocket hole.
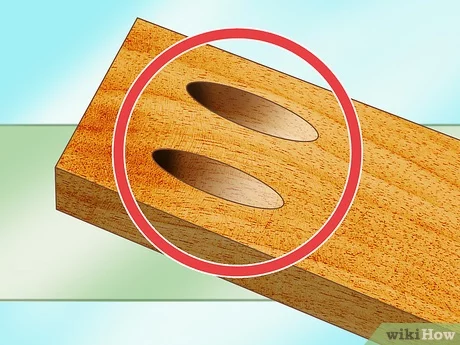
Step 8: Begin drilling
Turn on your drill and slowly guide it through the jig guide hole. Maintain a consistent speed while drilling until you’ve reached your predetermined depth.
Step 9: Repeat for additional pocket holes
If necessary, repeat Steps 5-8 for additional pocket holes along your project’s wood piece, ensuring that each hole is properly spaced from the others.
Step 10: Fasten the pieces together
Once you’ve completed all pocket holes, align your wood pieces and fasten them together using appropriate screws. Make sure the screws don’t penetrate through the opposite side of the material.
Step 11: Finish the project
Remove your clamps, sand any rough edges, and apply your preferred finish, such as paint or stain. Once complete, you’ll have a strong and secure joint created using your Kreg Jig.
By following these 11 steps, you’re well on your way to mastering the use of a Kreg Jig and creating impressive woodworking projects with ease. Remember to always follow manufacturer guidelines and practice proper safety precautions when working with power tools.