
How to Uninstall PostgreSQL: 11 Steps
Introduction:
PostgreSQL is a powerful, open-source object-relational database system that can handle workloads ranging from small applications to large enterprise systems. However, if you’re no longer using PostgreSQL or want to switch to a different database solution, you may need to uninstall it. Here’s a step-by-step guide on how to uninstall PostgreSQL.
Step 1: Backup Your Data
Before uninstalling PostgreSQL, make sure to backup all your important data stored in the database. You can use the ‘pg_dump’ or ‘pg_dumpall’ utility programs for this purpose.
Step 2: Stop the PostgreSQL Service
In order to safely remove PostgreSQL, first stop its service. On Windows, open the Services control panel and find “PostgreSQL” in the list. Right-click and select “Stop.” On Linux, execute the following command: ‘sudo systemctl stop postgresql’
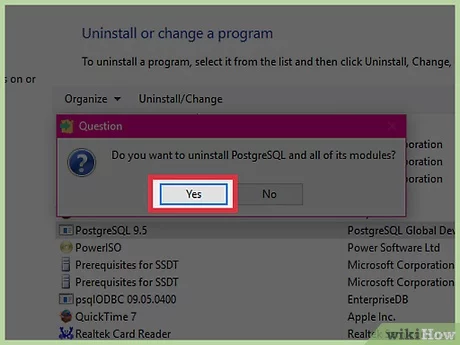
Step 3: Uninstalling PostgreSQL on Windows
Navigate to Control Panel > Programs > Programs and Features. Find “PostgreSQL” in the list of installed applications, right-click it and select “Uninstall.” Follow the prompts to complete the process.
Step 4: Uninstalling PostgreSQL on Linux
For Linux systems, use your package manager (apt or yum) with the appropriate command.
For apt (Debian/Ubuntu): ‘sudo apt-get remove postgresql’
For yum (RedHat/CentOS/Fedora): ‘sudo yum remove postgresql’
Step 5: Remove Configuration Files
After uninstalling PostgreSQL through your package manager, you should also remove configuration files left behind.
On Linux:
– Delete the PostgreSQL data directory; typically ‘/var/lib/postgresql/’
– Delete any other configuration files found in ‘/etc/postgresql/’
On Windows:
– Remove the PostgreSQL installation directory; usually ‘C:\Program Files\PostgreSQL\’
– Remove any remaining settings and data directories within ‘C:\Users\<Username>\AppData\’
Step 6: Remove User and Group (Linux)
On Linux systems, it’s a good idea to remove the PostgreSQL user and group by executing the following commands:
– ‘sudo userdel postgres’
– ‘sudo groupdel postgres’
Step 7: Remove Startup Scripts (Linux)
Some systems might still have startup scripts referencing PostgreSQL. Look for any startup scripts in ‘/etc/init.d/’ or ‘/etc/systemd/system/’ and remove them.
Step 8: Check Environment Variables
Ensure that no environment variables reference PostgreSQL or its binaries. On Linux, check your ‘/etc/environment’ file and your shell’s configuration files. On Windows, inspect your system’s Environment Variables settings via the Control Panel.
Step 9: Restart your Computer
After completing all the steps above, restart your computer to ensure all changes take effect.
Step 10: Verify Uninstallation
Once your computer has restarted, verify that PostgreSQL is no longer running by checking for any related processes in Task Manager (Windows) or running ‘ps aux | grep postgres’ command on Linux.
Step 11: Cleanup
Finally, it’s a good idea to perform a general cleanup of your system to remove any temporary files or leftover artifacts related to PostgreSQL.
Conclusion:
Following these steps will help you uninstall PostgreSQL from your system completely and safely. Make sure to backup all your important data before proceeding with the uninstallation process.
