How to Sync iPhone to a Computer
Syncing your iPhone to a computer is an important process that can help you to keep your data safe, as well as transfer files between your devices. In this article, we will guide you through the steps to sync your iPhone to a computer.
Step 1: Connect your iPhone to the computer
To start the syncing process, connect your iPhone to the computer using a USB cable. Make sure that you are using a cable that is compatible with your device and that your computer is turned on.
Step 2: Launch iTunes
Once you have connected your iPhone to the computer, launch iTunes. If you don’t have iTunes installed on your computer, you can download it from the Apple website.
Step 3: Select your iPhone
Once iTunes has launched, select your iPhone from the list of devices in the top left corner of the screen.
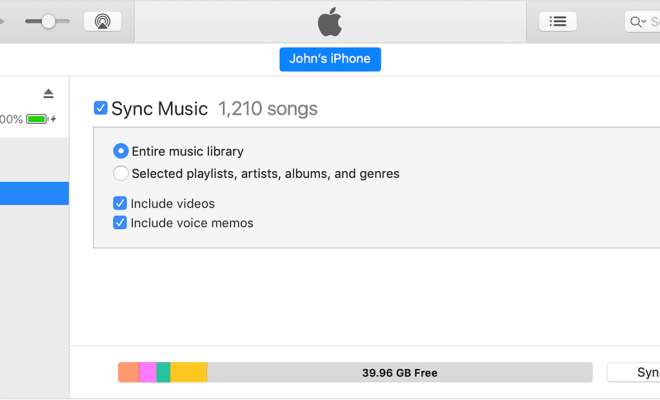
Step 4: Choose what to sync
Next, choose what you want to sync between your iPhone and your computer. You can sync a variety of items, including music, photos, videos, and more. To select what you want to sync, simply click on the appropriate tab in the iTunes interface.
Step 5: Start syncing
After you have selected what you want to sync, click the “Sync” button in the bottom right corner of the iTunes interface. This will start the syncing process, which may take several minutes depending on how much data you are syncing.
Step 6: Disconnect your iPhone
Once the syncing process is complete, you can disconnect your iPhone from the computer. To do this, simply unplug the USB cable from your device.
Conclusion
Syncing your iPhone to a computer is an essential process that can help you to keep your data safe and transfer files between your devices. By following these simple steps, you can easily sync your iPhone to a computer and enjoy all the benefits that come with it.