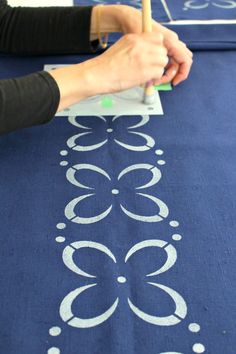
How to Stencil Fabric

Stenciling fabric is a simple and creative way to add a unique touch to your clothing, accessories, or home décor items. With a few supplies and some time, you can create lovely patterns that will leave everyone asking where you bought your unique pieces. In this article, we’ll walk you through the steps required to stencil fabric successfully.
Materials:
– Fabric (choose a smooth material for best results)
– Stencil (store-bought or homemade)
– Fabric paint or acrylic paint with fabric medium
– Stencil brush, sponge or foam applicator
– Masking tape
– Cardboard or newspaper
– Iron
Step 1: Choose Your Fabric and Stencil
When picking out your fabric, it’s best to choose a smooth material such as cotton or canvas. This will help the stencil adhere better and make sure your lines are precise. Next, choose or create a stencil that speaks to you creatively. You can find premade stencils in craft stores or create one by cutting a design into a plastic sheet or using adhesive vinyl.
Step 2: Prep Your Workspace
Before beginning, set up your workspace by placing cardboard or newspaper under the fabric to protect surfaces from paint seepage. Make sure you have a clean surface to work on and gather all your materials in one place.
Step 3: Position Your Stencil
Position the stencil on the fabric and secure it in place using masking tape. This will prevent it from shifting during painting and ensure crisp lines.
Step 4: Apply the Paint
Using your choice of stencil brush, sponge or foam applicator, dab into the paint ensuring there isn’t too much excess (a light dabbing motion is good practice). Apply the paint onto the fabric with an up-and-down dabbing motion as opposed to brushing back and forth – this will minimize any paint leaking under the stencil and maintain the integrity of your design.
Step 5: Remove the Stencil
Once you’ve covered the entire stencil, gently remove it from the fabric. You may need to use tweezers for any intricate designs that are sticking to the fabric. Be careful not to smear the paint as you lift the stencil.
Step 6: Clean Up
Allow the paint to dry according to the manufacturer’s directions, typically between 24-72 hours. Clean your stencil, brush, or applicator immediately after use with soap and water.
Step 7: Heat Set Your Design
To set your design and make it more durable, follow your paint manufacturer’s recommendations for heat setting. Usually, this involves ironing on the reverse side of the fabric for a certain amount of time or putting your item in the dryer.
Now you’ll have a beautiful stenciled design on your fabric that adds a touch of personalization and artistry. Experiment with different patterns, colors, and fabrics to create unique pieces for yourself or as gifts for loved ones. Happy stenciling!


