How to Stain a Cedar Fence
Introduction:
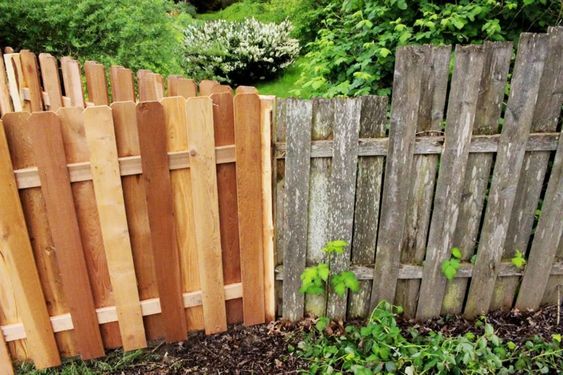
Staining a cedar fence is a great way to not only improve the look of your property but also increase the fence’s lifespan by protecting it from weather elements like moisture and UV rays. This step-by-step guide will walk you through the process of staining a cedar fence, allowing you to enhance your outdoor living space and add value to your home.
Materials and Tools:
To stain a cedar fence, you will need the following materials and tools:
1. Wood stain (choose a color that matches your preference)
2. Wood cleaner or brightener (if necessary)
3. Paintbrushes or stain pads (for applying stain)
4. Drop cloth (to protect plants and surrounding surfaces)
5. Power washer or stiff-bristle brush
6. Scraper or putty knife
7. Sandpaper (180-220 grit)
8. Gloves and safety goggles
9. Painter’s tape
Step-by-Step Guide:
Step 1: Choose Your Stain
Before starting, ensure you have selected an appropriate wood stain for your cedar fence. Consider factors such as color, weather resistance, and UV protection when making your decision.
Step 2: Clean the Fence
Begin by cleaning your cedar fence thoroughly using a power washer or stiff-bristle brush to remove any dirt, debris, mildew, or old stain/paint residues. If necessary, use a wood cleaner or brightener product to help clean the surface.
Step 3: Repair Damaged Boards
Inspect your fence for any damaged boards that may need to be repaired or replaced before staining. Replace broken or damaged boards with new cedar planks as needed.
Step 4: Sand the Surface
Lightly sand the cedar fence using 180-220 grit sandpaper to remove any rough spots, splinters, or flakes for a smooth finish. Dust off the surface with a clean cloth afterward.
Step 5: Protect Surrounding Surfaces
Lay down a drop cloth to protect plants and nearby surfaces from any potential spills or drips. Use painter’s tape to mask any areas that should not be stained, such as metal hardware.
Step 6: Apply the Stain
Wear gloves and safety goggles. Using a paintbrush or stain pad, apply the wood stain evenly along the grain of the cedar fence, working in sections to ensure consistent coverage. Apply as many coats as specified by the stain manufacturer’s instructions, allowing for sufficient drying time between coats.
Step 7: Clean Up
Once the stain is completely dry, remove any painter’s tape and collect all tools and materials. Dispose of waste products according to local guidelines.
Conclusion:
Staining a cedar fence not only enhances its look but also extends its durability by protecting it from weather elements like moisture and UV rays. This step-by-step guide makes it easy for anyone to stain their cedar fence and beautify their property while increasing its value. Regular maintenance will ensure years of use and enjoyment.