The Tech Edvocate

Top Menu

  • Advertisement
  • Apps
  • Home Page
  • Home Page Five (No Sidebar)
  • Home Page Four
  • Home Page Three
  • Home Page Two
  • Home Tech2
  • Icons [No Sidebar]
  • Left Sidbear Page
  • Lynch Educational Consulting
  • My Account
  • My Speaking Page
  • Newsletter Sign Up Confirmation
  • Newsletter Unsubscription
  • Our Brands
  • Page Example
  • Privacy Policy
  • Protected Content
  • Register
  • Request a Product Review
  • Shop
  • Shortcodes Examples
  • Signup
  • Start Here
    • Governance
    • Careers
    • Contact Us
  • Terms and Conditions
  • The Edvocate
  • The Tech Edvocate Product Guide
  • Topics
  • Write For Us
  • Advertise

Main Menu

  • Start Here
    • Our Brands
    • Governance
      • Lynch Educational Consulting, LLC.
      • Dr. Lynch’s Personal Website
      • Careers
    • Write For Us
    • The Tech Edvocate Product Guide
    • Contact Us
    • Books
    • Edupedia
    • Post a Job
    • The Edvocate Podcast
    • Terms and Conditions
    • Privacy Policy
  • Topics
    • Assistive Technology
    • Child Development Tech
    • Early Childhood & K-12 EdTech
    • EdTech Futures
    • EdTech News
    • EdTech Policy & Reform
    • EdTech Startups & Businesses
    • Higher Education EdTech
    • Online Learning & eLearning
    • Parent & Family Tech
    • Personalized Learning
    • Product Reviews
  • Advertise
  • Tech Edvocate Awards
  • The Edvocate
  • Pedagogue
  • School Ratings

logo

The Tech Edvocate

  • Start Here
    • Our Brands
    • Governance
      • Lynch Educational Consulting, LLC.
      • Dr. Lynch’s Personal Website
        • My Speaking Page
      • Careers
    • Write For Us
    • The Tech Edvocate Product Guide
    • Contact Us
    • Books
    • Edupedia
    • Post a Job
    • The Edvocate Podcast
    • Terms and Conditions
    • Privacy Policy
  • Topics
    • Assistive Technology
    • Child Development Tech
    • Early Childhood & K-12 EdTech
    • EdTech Futures
    • EdTech News
    • EdTech Policy & Reform
    • EdTech Startups & Businesses
    • Higher Education EdTech
    • Online Learning & eLearning
    • Parent & Family Tech
    • Personalized Learning
    • Product Reviews
  • Advertise
  • Tech Edvocate Awards
  • The Edvocate
  • Pedagogue
  • School Ratings
  • Miro vs Conceptboard for project management

  • How to use Teamwork for resource management

  • How much does Procore cost per month

  • How to organize Microsoft Planner buckets

  • Is Teamwork good for billable hours

  • Procore vs Buildertrend which is better

  • Airtable project management templates

  • Can Miro track project progress

  • How to use Basecamp for client work

  • Can Lucidchart create swimlane diagrams

Assistive Technology
Home›Assistive Technology›How to Set Up Your Raspberry Pi as a Web Server

How to Set Up Your Raspberry Pi as a Web Server
By Matthew Lynch
June 23, 2023
0
Spread the love

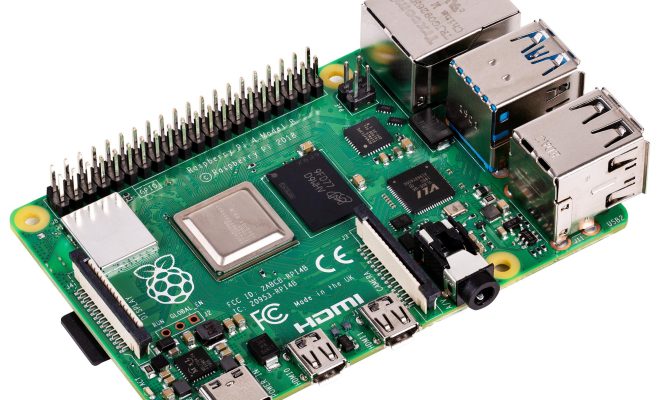
If you’re looking to create a personal website or test some web application projects on your own, using a Raspberry Pi as a web server is a great and affordable option. Here’s how to set up your Raspberry Pi as a web server, including the steps to install and configure the Apache web server software.

Step 1: Download and Install Raspbian

The first step in setting up your Raspberry Pi as a web server is to download and install Raspbian on your device. Raspbian is the official Raspberry Pi operating system based on the Linux distribution Debian. You can download Raspbian from the official Raspberry Pi website and follow the installation process outlined in the documentation.

Step 2: Install Apache

After you’ve installed Raspbian on your Raspberry Pi, you can start installing the Apache web server software. To do this, open the Terminal on your Raspberry Pi and type in the following command:

sudo apt-get update

sudo apt-get install apache2 -y

This command will update your Raspberry Pi’s package list and install the Apache web server software on your device.

Step 3: Test Your Apache Web Server Setup

Once you have installed Apache, you must check that it is working correctly. You can do this by opening your web browser and entering the IP address of your Raspberry Pi in the address bar. If you don’t know the IP address of your Raspberry Pi, type the following command into the Terminal:

hostname -I

This command will display your Raspberry Pi’s IP address. Type this into your browser’s address bar and you should see a default Apache web page displayed. If everything is working correctly, a page should appear saying “It works!”.

Step 4: Configure Your Apache Web Server

Now that you have installed and tested Apache, you can begin to configure it to your desired configuration. First, navigate to the “/var/www” directory in the Terminal. Here is where you can create and store your website files.

To create a new webpage, create an HTML file using your favorite text editor. Save this file in the “/var/www” directory and make sure the file has a “.html” extension. Here is an example command to create an HTML file using the Nano text editor:

nano /var/www/index.html

Now, when you enter your Raspberry Pi’s IP address into your web browser, it should display the webpage that you just created.

Step 5: Add PHP Support to Your Raspberry Pi Web Server (Optional)

If you plan on building dynamic web pages, you will need to install PHP support on your Raspberry Pi web server. To do this, open the Terminal and type in the following command:

sudo apt-get install php -y

Once the PHP package is installed, check that it is working by creating a new PHP file using your favorite text editor, saving the file in the “/var/www” directory with the name “index.php”. This file should contain the following code:

echo “Hello World!”;

?>

Now, when you enter the IP address of your Raspberry Pi into your web browser followed by “/index.php”, you should see the message “Hello World!” displayed on screen.


Previous Article

Why People Still Love Pebble Smartwatches

Next Article

How to Use the Criterion Channel Streaming ...

Matthew Lynch

Related articles More from author

  • Assistive Technology

    How to Stop Android’s Speech-to-Text From Blocking Swear Words

    June 23, 2023
    By Matthew Lynch
  • Assistive Technology

    The Best Amazon Customer Service Tips That Make You a Better Shopper

    June 23, 2023
    By Matthew Lynch
  • Assistive Technology

    How to Clone Your Linux Hard Drive: 4 Methods

    June 22, 2023
    By Matthew Lynch
  • Assistive Technology

    How to Group Rows and Columns With Outlines and Subtotals in Excel

    June 12, 2023
    By Matthew Lynch
  • Assistive Technology

    How to Install and Use Homebrew on Linux

    June 23, 2023
    By Matthew Lynch
  • Assistive Technology

    How to Change the Notes Password on an iPhone

    June 8, 2023
    By Matthew Lynch

Search

Login & Registration

  • Log in
  • Entries feed
  • Comments feed
  • WordPress.org

Newsletter

Signup for The Tech Edvocate Newsletter and have the latest in EdTech news and opinion delivered to your email address!

About Us

Since technology is not going anywhere and does more good than harm, adapting is the best course of action. That is where The Tech Edvocate comes in. We plan to cover the PreK-12 and Higher Education EdTech sectors and provide our readers with the latest news and opinion on the subject. From time to time, I will invite other voices to weigh in on important issues in EdTech. We hope to provide a well-rounded, multi-faceted look at the past, present, the future of EdTech in the US and internationally.

We started this journey back in June 2016, and we plan to continue it for many more years to come. I hope that you will join us in this discussion of the past, present and future of EdTech and lend your own insight to the issues that are discussed.

Newsletter

Signup for The Tech Edvocate Newsletter and have the latest in EdTech news and opinion delivered to your email address!

Contact Us

The Tech Edvocate
910 Goddin Street
Richmond, VA 23231
(601) 630-5238
[email protected]

Copyright © 2026 Matthew Lynch. All rights reserved.