How to Paint Chrome Bumpers: 15 Steps

1.Gather materials: Before starting your project, gather all the necessary materials, including chrome primer, paint, clear coat, wet or dry sandpaper (320 and 600 grit), masking tape, newspapers or plastic sheets, and cleaning supplies such as soap, water and a soft cloth.
2.Clean the bumper thoroughly: Wash the chrome bumper with soap and water to remove dirt and grime. Use a soft cloth to avoid scratching the surface.
3.Remove any rust or corrosion: If there are rust spots on the bumper, use a rust remover product or sand them away with fine-grit sandpaper (320 grit). After removing rust, wipe the bumper down with a damp cloth to remove any residue.
4.Sand the surface: Using a 320-grit sandpaper, lightly sand the entire chrome bumper in circular motions. This will help create an even surface for primer adherence.
5.Wipe down the bumper: Use a damp cloth to wipe away any dust or debris that may have accumulated during sanding. Allow the bumper to air dry completely before proceeding.
6.Mask off areas you don’t want painted: Using masking tape and newspapers or plastic sheets, cover any areas on or around the bumper that you do not want painted.
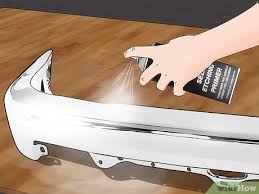
7.Apply chrome primer: Shake the primer can well for about 30-60 seconds and then begin applying thin coats of primer in even strokes. Allow each coat to dry according to the manufacturer’s instructions before applying additional coats.
8.Sand the primer: Once the final coat of primer has dried completely, gently sand it using 600-grit sandpaper to ensure a smooth surface for painting.
9.Clean off excess dust: Wipe away any dust from sanding with a damp cloth and allow it to air dry again.
10.Apply paint color: Following the same procedure as you did with the primer, shake the paint well for 30-60 seconds and then apply several thin coats of paint. Allow each coat to dry according to the manufacturer’s instructions before applying additional coats.
11.Inspect for imperfections: Once the paint is completely dry, inspect the bumper for any imperfections. If you find any areas that need touch-ups, lightly sand the area, clean with a damp cloth and reapply paint in thin coats.
12.Apply clear coat: After the final coat of paint has dried and you’re satisfied with the appearance, apply 2-3 coats of clear coat, allowing each coat to dry between applications.
13.Remove masking materials: Once the clear coat is completely dry, carefully remove all masking tape and protective material from your bumper.
14.Buff out any final imperfections: If there are any imperfections in the clear coat, carefully buff them out using fine-grit sandpaper (1500-2000 grit) and a soft cloth.
15.Reattach your bumper: Finally, reinstall your painted chrome bumper back onto your vehicle according to its specific assembly instructions. Your newly painted chrome bumper should now be ready to show off!
By following these steps, you can successfully paint your chrome bumper and give it a fresh, new look. Remember to take your time during each step and always follow the manufacturer’s instructions for best results. Happy painting!


