How to Make Business Cards with GIMP

In today’s world, a business card is still one of the most critical ingredients in making a lasting first impression. However, crafting the perfect business card doesn’t require expensive tools or professional designers. With GIMP, a free and powerful image manipulation software, you can quickly create your personalized business cards. In this article, we’ll walk you through the steps to design and print a stunning card from scratch using GIMP.
1. Install GIMP
If you haven’t already, download and install GIMP from the official website (https://www.gimp.org/). Ensure that you have the latest version installed for optimal performance.
2. Create a new file for your business card
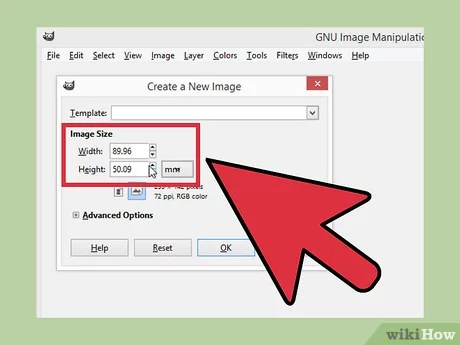
Open GIMP and create a new file (File > New). Set the width to 1050 pixels and the height to 600 pixels, with a 300ppi resolution. This size corresponds to the standard 3.5 x 2 inches business card dimension, including a small bleed area around the edges.
3. Set up guidelines
To help align elements on your business card, go to Image > Guides > New Guides (by Percent). Create vertical guides at 10%, 90%, and 50%, as well as horizontal guides at 10% and 90%. Your canvas should now have an equal border with guidelines around it.
4. Design the front side of the card
Start by selecting a background color or pattern for your business card by using the Paint Bucket Tool. Next, add your company logo (File > Open as Layers) and adjust its size and placement by using the Scale Tool.
Now it’s time to add your text – select the Text Tool from the toolbar and choose an appropriate font, size, and color for your name, title, company name, contact details (phone number, email address), website URL, and social media handles. Organize this information neatly within the guidelines, ensuring it is legible and looks professional.
5. Design the back side of the card
Create a new layer and design the back side of your card similarly, focusing on your company logo, website URL, or any other vital information you’d like to highlight.
6. Export your business card design
When you’re satisfied with the design, you need to save each side of the card as a separate file, ideally in TIFF or PNG format (File > Export As).
7. Print your business cards
Before printing your business cards, consult with your printer regarding size considerations and formats they prefer. Most professional printing service providers will require a small bleed area around the edges and may prefer CMYK color mode instead of RGB.
Upload your design files and follow their printing guidelines. You can also test print at home using cardstock paper by adjusting your printer settings for high-quality output.
And there you have it! With GIMP, you’ve successfully created an attractive, professional-looking business card without breaking the bank. Experiment with different


