How to Make a Stylus for iPad

Introduction
A stylus is a fantastic accessory for your iPad, allowing you to write, draw, and navigate with precision while minimizing accidental touch inputs or fingerprints. While they are readily available for purchase, you might not know that you can actually create your own stylus at home, often using materials you may already have within reach. In this article, we will guide you through several simple methods for making a DIY stylus for your iPad.
Method 1: Sponge Stylus
Materials:
– Sponge
– Pen
– Scissors or knife
Steps:
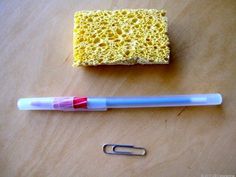
1. Find a pen with a clip on the cap or on the body; this will be the base of your DIY stylus.
2. Look for a sponge with a conductive surface (most kitchen sponges will work).
3. Using scissors or a knife, carefully cut out a small rectangle from the sponge.
4. Wet the sponge slightly; it should be damp but not dripping.
5. Place the damp sponge piece over the pen’s writing tip and secure it using the clip.
6. Test your new sponge stylus on your iPad – it should work perfectly!
Method 2: Aluminum Foil Stylus
Materials:
– Aluminum foil
– Pen
– Cotton swab (Q-tip)
– Scissors or knife
Steps:
1. Remove one of the cotton swabs from the Q-tip.
2. Insert the cottonless end of the Q-tip into the hole where the pen’s ink cartridge was removed.
3. Cut a piece of aluminum foil large enough to cover the Q-tip and part of the pen body.
4. Wrap the aluminum foil around the Q-tip end and pen, ensuring that it covers part of your fingers when holding the pen.
5. Dampen (not soak) the cotton swab end with water – this will help to improve conductivity.
6. Test your aluminum foil stylus on your iPad, and enjoy the precise and smooth control!
Method 3: Wire and Conductive Foam Stylus
Materials:
– A piece of conductive foam (often used for packaging electronic components)
– A thin wire or paper clip
– Pen
– Tape
Steps:
1. Cut a small piece of conductive foam, about the size of an eraser head.
2. Wrap one end of the wire or straighten paper clip around the foam piece to secure it.
3. Insert the other end of the wire or paper clip into the pen barrel.
4. Wind any excess wire around the pen body for added stability.
5. Secure the foam end and the wire with some tape.
6. Test your wire and conductive foam stylus on your iPad to experience accurate input with minimal lag.
Conclusion
Creating your own stylus for your iPad is not just a fun DIY project but can also save you money on purchasing a store-bought equivalent. With these three methods, you now have a variety of options for creating your custom stylus using simple household materials. Happy swiping!


