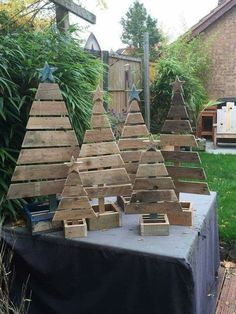
How to Make a Pallet Christmas Tree

The holiday season is a time for family, friends, and festive decorations. One creative and eco-friendly way to participate in the festivities is by crafting your own pallet Christmas tree. Not only do these trees add a touch of rustic charm to your home, but they also help repurpose old wooden pallets that would otherwise be discarded. In this article, we will walk you through the steps to bring your unique pallet Christmas tree to life.
Materials Needed:
– One wooden pallet
– Saw (jigsaw or handsaw)
– Sandpaper or a handheld sander
– Wood screws
– Electric drill
– Wood stain or paint
– Paintbrush or paint roller
– Protective gloves and eyewear
– Optional: fairy lights, ornaments, and other holiday decorations
Step 1: Prepare Your Pallet
First, select a wooden pallet in good condition. It should be relatively clean and free from cracks or other damage. You may wish to disinfect the pallet before starting, especially if it is damp or dirty. Once ready, lay the pallet flat on an even surface.
Step 2: Design Your Tree
Next, sketch a simple tree design on the pallet using a pencil or chalk. You can make this as detailed or basic as desired – triangles with different dimensions look great! This outline will serve as your cutting guide.
Step 3: Cut the Pallet
Put on protective gloves and eyewear before using your saw to cut along the drawn lines. Follow proper safety measures when handling power tools and have someone assist you if needed.
Step 4: Sand the Surface
Now that your tree’s shape is cut out, it’s time to smooth out any rough edges. Use sandpaper or a handheld sander to even out surfaces and prevent splinters. Be sure to pay special attention to corners and exposed ends.
Step 5: Stain or Paint Your Tree
For a natural look, apply wood stain in your desired shade, or give it a pop of color with paint. Use a brush or roller to cover the tree evenly, following the instructions on the paint or stain canister. Allow for drying time as required.
Step 6: Add Supports and Stand Your Tree
To stabilize your tree, add supportive crossbeams using extra pieces from the pallet. Holding one side of the tree upright, position a crossbeam at an appropriate angle and secure it with wood screws on each end using your drill. Flip the tree over, and repeat for the other side at the same angle. Now your tree is ready to stand.
Step 7: Decorate Your Pallet Christmas Tree
Let your creativity shine as you decorate your new pallet Christmas tree! Attach fairy lights and ornaments using hooks or twine, drape garlands, or even personalize it with stencils and paint.
Your pallet Christmas tree is now complete – a charming reflection of your DIY skills and resourceful spirit. Enjoy your unique decoration as you gather family and friends around it to create cherished holiday memories.


