How to Make a Model Water Tower

Introduction
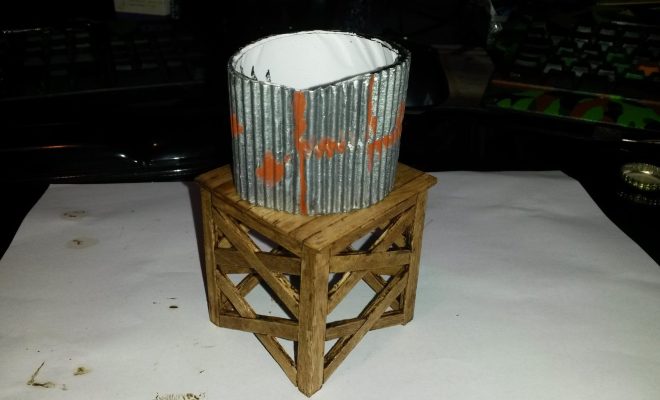
Water towers are iconic structures that can be found in communities around the world. They serve as water reservoirs, which help maintain consistent water pressure in local water distribution systems. Building a model water tower can be a fun and educational project that teaches about the importance of these structures and allows for creative expression. In this article, we will guide you through the process of making your own miniature water tower using easily accessible materials.
Materials Needed:
– Cardboard or foam board
– Cardboard tubes (from paper towel rolls or toilet paper rolls)
– Ruler
– Pencil or marker
– Scissors or craft knife
– Hot glue gun and glue sticks
– Acrylic paint and paintbrushes
– Optional: sandpaper, wooden dowels, masking tape, small decorations, or embellishments
Step 1: Design Your Water Tower
Before you begin building your model water tower, it’s essential to decide on its design. You can either research existing water towers for inspiration or create your own unique design. Consider the scale of your model, as well as the materials and colors you’d like to use. Sketch out your ideas on paper to better visualize your final product.
Step 2: Prepare Your Materials
Cut out pieces of cardboard or foam board according to the dimensions you determined during the design phase. You’ll need a large, flat circular base for your tower, pieces to form the legs or supports, and components for the main reservoir. Additionally, gather cardboard tubes for the supporting legs.
Step 3: Build the Base and Supports
With your hot glue gun, securely attach the cardboard tubes to the circular base to create pillar-like supports. Make sure they are evenly spaced out and straight, as they’ll provide stability for your water tower’s reservoir.
Optional: If you prefer sturdier supports, you can use wooden dowels instead of cardboard tubes.
Step 4: Construct the Reservoir
To create your water tower’s reservoir, glue together pieces of cardboard or foam board, ensuring the edges meet up evenly and form a solid container shape. Common reservoir shapes include cylindrical, spherical, or rectangular. Be sure to leave an opening at the bottom of the reservoir so that it can be placed on top of the supports.
Step 5: Attach the Reservoir to Supports
Carefully align the reservoir’s opening with the supports’ tops, and secure it in place with hot glue. Make sure the reservoir is evenly balanced and properly attached to prevent it from toppling over.
Step 6: Decorations and Finishing Touches
Sand any rough edges of your model water tower until they’re smooth. Apply masking tape to create specific patterns or sections for painting. Then, paint your water tower using acrylics, making certain to cover all sections evenly and allowing time for paint layers to dry.
Feel free to add details such as ladders, logos, or warning signs using additional materials. In this step, feel free to let your creativity run wild!
Step 7: Display Your Model Water Tower
Now that your model water tower is complete, find a suitable place to display your masterpiece where others can appreciate its intricate design.
Building a model water tower is a fantastic way to learn about these essential structures while exercising creative skills. With some planning, patience, and a bit of imagination, you’ll have a unique model that represents both engineering marvels and artistic vision.


