The Tech Edvocate

Top Menu

  • Advertisement
  • Apps
  • Home Page
  • Home Page Five (No Sidebar)
  • Home Page Four
  • Home Page Three
  • Home Page Two
  • Home Tech2
  • Icons [No Sidebar]
  • Left Sidbear Page
  • Lynch Educational Consulting
  • My Account
  • My Speaking Page
  • Newsletter Sign Up Confirmation
  • Newsletter Unsubscription
  • Our Brands
  • Page Example
  • Privacy Policy
  • Protected Content
  • Register
  • Request a Product Review
  • Shop
  • Shortcodes Examples
  • Signup
  • Start Here
    • Governance
    • Careers
    • Contact Us
  • Terms and Conditions
  • The Edvocate
  • The Tech Edvocate Product Guide
  • Topics
  • Write For Us
  • Advertise

Main Menu

  • Start Here
    • Our Brands
    • Governance
      • Lynch Educational Consulting, LLC.
      • Dr. Lynch’s Personal Website
      • Careers
    • Write For Us
    • The Tech Edvocate Product Guide
    • Contact Us
    • Books
    • Edupedia
    • Post a Job
    • The Edvocate Podcast
    • Terms and Conditions
    • Privacy Policy
  • Topics
    • Assistive Technology
    • Child Development Tech
    • Early Childhood & K-12 EdTech
    • EdTech Futures
    • EdTech News
    • EdTech Policy & Reform
    • EdTech Startups & Businesses
    • Higher Education EdTech
    • Online Learning & eLearning
    • Parent & Family Tech
    • Personalized Learning
    • Product Reviews
  • Advertise
  • Tech Edvocate Awards
  • The Edvocate
  • Pedagogue
  • School Ratings

logo

The Tech Edvocate

  • Start Here
    • Our Brands
    • Governance
      • Lynch Educational Consulting, LLC.
      • Dr. Lynch’s Personal Website
        • My Speaking Page
      • Careers
    • Write For Us
    • The Tech Edvocate Product Guide
    • Contact Us
    • Books
    • Edupedia
    • Post a Job
    • The Edvocate Podcast
    • Terms and Conditions
    • Privacy Policy
  • Topics
    • Assistive Technology
    • Child Development Tech
    • Early Childhood & K-12 EdTech
    • EdTech Futures
    • EdTech News
    • EdTech Policy & Reform
    • EdTech Startups & Businesses
    • Higher Education EdTech
    • Online Learning & eLearning
    • Parent & Family Tech
    • Personalized Learning
    • Product Reviews
  • Advertise
  • Tech Edvocate Awards
  • The Edvocate
  • Pedagogue
  • School Ratings
  • The Lobby Before the Lights: How Digital Casino Design Sets an Evening in Motion

  • The Lobby Before the Lights: How Small Interface Choices Shape Casino Discovery

  • The Reckless Rise of AI Finance: Why You Could Lose Everything

  • Baffling: Fintech Founder’s $6.7 Million Lie — And How to Spot the Red Flags

  • Dramatic: Teddy AI Funding Ignites Legal Tech’s $60M Consolidation Battle

  • Florida’s Gambling War: Seminole Tribe’s Bold Move Against DraftKings Could Reshape Betting Forever

  • California’s Bold AI Move: Nearly 30 New Laws Reshape Tech’s Future

  • The AI Skills Gap: Why 71% of Companies Are Dramatically Behind — And What It Means For Your Career

  • Unbelievable: AI Deepfake Phishing Attacks Just Got a Whole Lot Scarier

  • This One Reckless Data Breach Just Exposed 50 Million Bank Customers

How To
Home›How To›How to Install Floor Tile

How to Install Floor Tile
By Matthew Lynch
March 23, 2024
0
Spread the love

Introduction:

Floor tiles can transform the look and feel of any space, brining both aesthetics and durability to your home or office. Installing floor tiles might seem like a daunting task, but with the right tools, materials, and guidelines, you can achieve professional-looking results on your own. This comprehensive guide will help you understand how to install floor tile step by step.

Materials and tools needed:

1. Floor tiles

2. Tile spacers (small plastic x or t-shaped pieces)

3. Tile adhesive (also known as thinset or mortar)

4. Notched trowel

5. Level

6. Tile cutter or tile saw

7. Rubber mallet

8. Grout

9. Grout float

10. Sponge and bucket of water

11. Tape measure

12. Chalk line

Steps to install floor tile:

1. Preparation: Start by removing any old flooring, baseboards, moldings, or obstacles from the area you are tiling. Ensure that the surface is clean, smooth, and leveled before proceeding.

2. Layout planning: Measuring the length and width of the room will help you determine how many tiles you’ll need and where to begin laying them out on the floor. Starting from the center of the room is generally the best approach, as this provides balanced visuals and easier adjustments.

3. Snap chalk lines: Mark the center point of your room by snapping two intersecting chalk lines that divide the room into four quadrants.

4. Dry layout: Lay out your tiles without adhesive along the chalk lines in each quadrant to ensure proper spacing and alignment while allowing for tile spacers.

5. Apply adhesive: Starting at the center intersection of your chalk lines, use a notched trowel to spread an even layer of tile adhesive onto a manageable area of your floor.

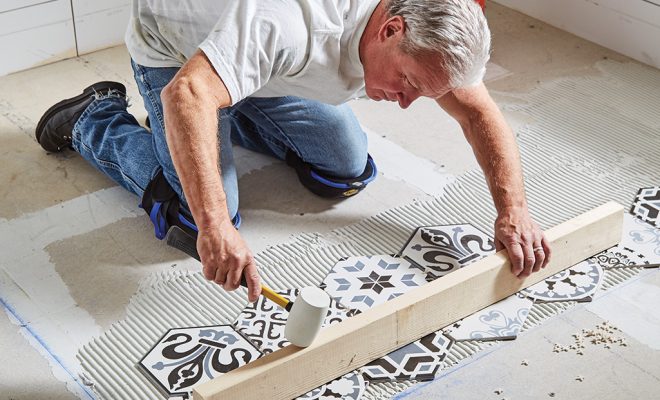
6. Install tiles: Press each tile firmly into the adhesive, using your rubber mallet to tap them gently into place and ensuring they sit level by periodically checking with your level. Use tile spacers to maintain consistent gaps between tiles for grout.

7. Cut tiles as needed: When you reach the edges of your room or any obstacles, use a tile cutter or tile saw to trim tiles accordingly, leaving expansion gaps around walls and other fixed objects.

8. Allow adhesive to dry: Follow the manufacturer’s instructions for your specific adhesive’s drying time, typically between 24-48 hours.

9. Grout installation: Mix grout according to manufacturer’s instructions. Using a grout float, spread grout across the face of your tiles, working at a diagonal angle to force it into the gaps between tiles. Once you have completely filled these spaces, use a damp sponge to remove excess grout from the tile surfaces.

10. Allow time to cure: Let the grout dry as per manufacturer’s recommendations before walking on your newly installed floor.

Conclusion:

Installing floor tiles can be a rewarding and cost-effective way to upgrade any space in your home. By following these steps and taking your time, you’ll be able to achieve professional results and enjoy long-lasting beauty and durability from your new floor!


Previous Article

4 Ways to Remove Overspray

Next Article

How to Buy a Keg

Matthew Lynch

Related articles More from author

  • How To

    How to Make and Sell Greeting Cards

    January 5, 2024
    By Matthew Lynch
  • How To

    How to Create a Facebook Fan Page

    March 23, 2024
    By Matthew Lynch
  • How To

    3 Ways to Install Applications on an iPod Touch

    April 4, 2024
    By Matthew Lynch
  • How To

    How to Prevent Razor Bumps

    October 18, 2023
    By Matthew Lynch
  • How To

    3 Easy Ways to Clean a Daith Piercing

    February 14, 2024
    By Matthew Lynch
  • How To

    How to Clean a Violin: 12 Steps

    October 26, 2023
    By Matthew Lynch

Search

Login & Registration

  • Log in
  • Entries feed
  • Comments feed
  • WordPress.org

Newsletter

Signup for The Tech Edvocate Newsletter and have the latest in EdTech news and opinion delivered to your email address!

About Us

Since technology is not going anywhere and does more good than harm, adapting is the best course of action. That is where The Tech Edvocate comes in. We plan to cover the PreK-12 and Higher Education EdTech sectors and provide our readers with the latest news and opinion on the subject. From time to time, I will invite other voices to weigh in on important issues in EdTech. We hope to provide a well-rounded, multi-faceted look at the past, present, the future of EdTech in the US and internationally.

We started this journey back in June 2016, and we plan to continue it for many more years to come. I hope that you will join us in this discussion of the past, present and future of EdTech and lend your own insight to the issues that are discussed.

Newsletter

Signup for The Tech Edvocate Newsletter and have the latest in EdTech news and opinion delivered to your email address!

Contact Us

The Tech Edvocate
910 Goddin Street
Richmond, VA 23231
(601) 630-5238
[email protected]

Copyright © 2026 Matthew Lynch. All rights reserved.