How to Install a Closet Rod: 14 Steps
Installing a closet rod can be a simple and practical way to increase the storage capacity of your closet. With just a few tools and materials, you can create a sturdy and functional rod to hang your clothes, keeping them organized and wrinkle-free. Follow these 14 steps to install a closet rod in your closet.
1. Gather the necessary materials: You will need a closet rod, rod brackets, screws, wall anchors (if needed), measuring tape, pencil, level, stud finder, drill, and screwdriver.
2. Empty the closet: Remove all items from the closet to allow easy access for the installation process.
3. Determine the placement of the rod: Decide on the height at which you want the rod. Consider the length of your hanging clothes and make sure there’s enough space below for them to hang freely.
4. Mark the stud locations: Using a stud finder, locate and mark the studs in your closet where you’ll attach the brackets.
5. Measure the distance between studs: Measure the distance between marked studs where you’ll be installing the brackets. This measurement will determine if you need additional support brackets for longer lengths.
6. Hold up one bracket at desired height: Position one bracket against the wall at your desired height and align it with a marked stud.
7. Level the bracket: Using a level, check that the bracket is flush with both vertical and horizontal planes.
8. Mark screw holes on wall: Using a pencil, mark where each screw hole is located on the wall while holding up the bracket in place.
9. Drill pilot holes: Drill pilot holes at each marked screw location using an appropriate drill bit size.
10. Install wall anchors (if necessary): If your walls require anchors due to their material or if no studs are available, insert wall anchors into pilot holes following manufacturer’s instructions.
11. Attach bracket to wall: With the appropriate screws, attach the first bracket to the wall by tightening them into the pilot holes or anchors.
12. Repeat for second bracket: Repeat steps 6-11 for the second bracket, ensuring it is parallel and lined up with the first bracket.
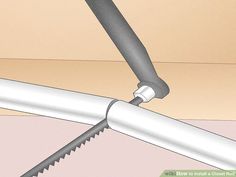
13. Install the closet rod: Slide one end of the rod into one bracket’s socket, then gently push and flex the rod until you can insert it into the opposite bracket’s socket as well.
14. Test the rod’s sturdiness: Give your closet rod a gentle pull to ensure it is securely in place and can support the weight of hanging clothes.
Now that your closet rod is installed, you can enjoy increased organization and storage in your closet. This simple home improvement project will make life a little easier, one hanger at a time.