
How to Format USB on Mac: 10 Steps
Introduction:
Formatting a USB drive on your Mac might seem complicated at first, but it’s actually quite simple. Whether you need to erase all the data from a flash drive or prepare it for use with a different operating system, this guide will walk you through the 10 steps to successfully format your USB drive on a Mac.
Step 1: Insert the USB Drive
Make sure your Mac is turned on and insert the USB drive into an available USB port.
Step 2: Launch Disk Utility
Click on the Launchpad icon in the Dock and type “Disk Utility” in the search field. Click on the Disk Utility application to open it.
Step 3: Locate Your USB Drive
In Disk Utility, look for your USB drive listed under “External” on the left side. Click on it to select it.
Step 4: Open the Erase Tab
With your USB drive selected, click on the “Erase” tab at the top of the Disk Utility window.
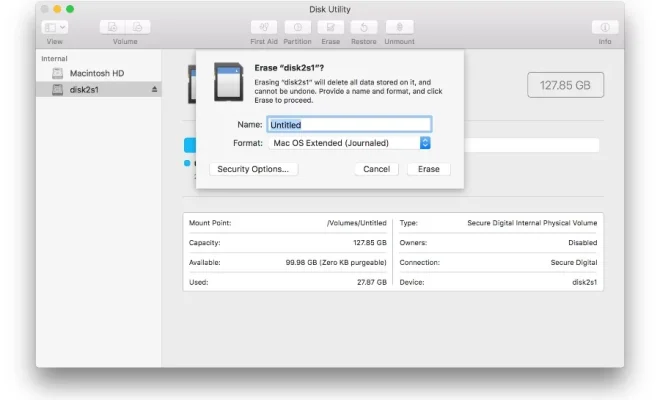
Step 5: Choose a Format
In the Erase tab, choose a format from the dropdown menu. For most purposes, choose either “MS-DOS (FAT)” for compatibility with Windows systems or “Mac OS Extended (Journaled)” if you only plan to use the drive with other Macs.
Step 6: Name Your USB Drive
Enter a name for your formatted USB drive in the “Name” field.
Step 7: Begin Formatting
Click the “Erase” button to start formatting your USB drive. This process may take some time depending on the size and speed of your flash drive. During this time, you’ll see a progress bar that provides an estimated time remaining.
Step 8: Monitor Formatting Progress
Wait for Disk Utility to finish formatting your USB drive. Do not eject or disconnect your flash drive during this process.
Step 9: Formatting Complete
Once Disk Utility has completed the formatting process, you’ll see a “Done” button. Click this button to close the Erase window.
Step 10: Eject Your USB Drive Safely
Finally, before removing your USB drive from your Mac, make sure to safely eject it. Right-click (or Control-click) your USB drive in Disk Utility and choose “Eject” from the menu.
Conclusion:
Congratulations! You’ve now successfully formatted your USB drive on a Mac. Regardless of whether you needed to erase data or prepare the drive for use with a different operating system, these 10 steps have helped you achieve your goal.
