How to Build a Hexagon Picnic Table
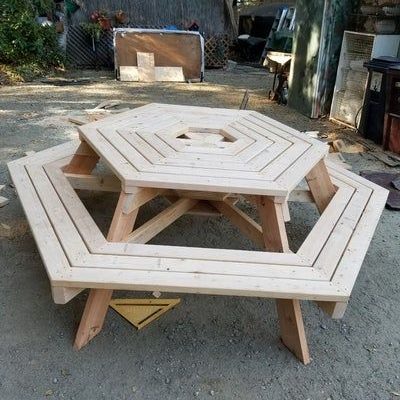
Outdoor spaces are perfect for gathering with friends and family, and a hexagon picnic table adds a unique touch to any backyard or patio. If you’re looking to add some character and functionality to your outdoor area, building a hexagon picnic table is the perfect DIY project. Here’s a step-by-step guide on how to build one yourself.
Materials:
– Pressure-treated lumber (2x4s, 2x6s, and 4x4s)
– Galvanized screws or nails
– Wood glue
– Stain or paint (optional)
Tools:
– Jigsaw or circular saw
– Drill and drill bits
– Speed square
– Tape measure
– Carpenter’s level
– Sandpaper or electric sander
Step 1: Determine the size of your table
Before you start cutting the wood, you need to decide how big you want your hexagon picnic table to be. Consider the space where you’ll place it and how many people it should accommodate. Once you’ve determined the size, make a sketch of the dimensions to help guide your construction process.
Step 2: Cut the wood
Based on your dimensions, cut the necessary pieces of wood for your hexagon tabletop, benches, frames, and legs. For the tabletop and benches, cut six equal-length segments from the pressure-treated 2x6s. For each frame, cut three 2x4s as per your measurements. The legs can be made from either 4x4s or doubled-up 2x4s.
Step 3: Assemble the tabletop and benches
Arrange the six tabletop pieces in a hexagonal shape with their edges touching. Secure them using galvanized screws or nails. Repeat this process for all six bench segments.
Step 4: Build the support frames
Construct three support frames using the 2x4s you’ve cut for this purpose. Each frame should consist of two crossbars parallel to each other and one diagonally connecting the two.
Step 5: Attach the support frames to the tabletop
Flip the tabletop upside down and evenly space the support frames on the underside of the tabletop. Attach them using wood glue and screws or nails, ensuring they are centered and level.
Step 6: Add the legs
Cut six legs from either 4x4s or doubled-up 2x4s, depending on your preference. Secure one leg at each corner of the three support frames, making sure they sit flush against both the frame and tabletop. Attach them with wood glue and screws or nails, then double-check that your table is sturdy and level.
Step 7: Attach the benches
Position each bench segment along one side of a hexagonal section of the tabletop. Make sure they are properly aligned and evenly spaced before securing them to the support frames using screws or nails.
Step 8: Sanding and finishing
Smooth out any rough edges or splinters with sandpaper or an electric sander. Finish your picnic table by applying stain or paint in the color of your choosing. Allow ample drying time before using it.
There you have it! A beautiful and functional hexagon picnic table that’s perfect for outdoor gatherings. With some planning, patience, and a bit of elbow grease, you can create a stunning centerpiece for all those sunny days outside with family and friends. Cheers to many picnics in your future!