The Tech Edvocate

Top Menu

  • Advertisement
  • Apps
  • Home Page
  • Home Page Five (No Sidebar)
  • Home Page Four
  • Home Page Three
  • Home Page Two
  • Home Tech2
  • Icons [No Sidebar]
  • Left Sidbear Page
  • Lynch Educational Consulting
  • My Account
  • My Speaking Page
  • Newsletter Sign Up Confirmation
  • Newsletter Unsubscription
  • Our Brands
  • Page Example
  • Privacy Policy
  • Protected Content
  • Register
  • Request a Product Review
  • Shop
  • Shortcodes Examples
  • Signup
  • Start Here
    • Governance
    • Careers
    • Contact Us
  • Terms and Conditions
  • The Edvocate
  • The Tech Edvocate Product Guide
  • Topics
  • Write For Us
  • Advertise

Main Menu

  • Start Here
    • Our Brands
    • Governance
      • Lynch Educational Consulting, LLC.
      • Dr. Lynch’s Personal Website
      • Careers
    • Write For Us
    • The Tech Edvocate Product Guide
    • Contact Us
    • Books
    • Edupedia
    • Post a Job
    • The Edvocate Podcast
    • Terms and Conditions
    • Privacy Policy
  • Topics
    • Assistive Technology
    • Child Development Tech
    • Early Childhood & K-12 EdTech
    • EdTech Futures
    • EdTech News
    • EdTech Policy & Reform
    • EdTech Startups & Businesses
    • Higher Education EdTech
    • Online Learning & eLearning
    • Parent & Family Tech
    • Personalized Learning
    • Product Reviews
  • Advertise
  • Tech Edvocate Awards
  • The Edvocate
  • Pedagogue
  • School Ratings

logo

The Tech Edvocate

  • Start Here
    • Our Brands
    • Governance
      • Lynch Educational Consulting, LLC.
      • Dr. Lynch’s Personal Website
        • My Speaking Page
      • Careers
    • Write For Us
    • The Tech Edvocate Product Guide
    • Contact Us
    • Books
    • Edupedia
    • Post a Job
    • The Edvocate Podcast
    • Terms and Conditions
    • Privacy Policy
  • Topics
    • Assistive Technology
    • Child Development Tech
    • Early Childhood & K-12 EdTech
    • EdTech Futures
    • EdTech News
    • EdTech Policy & Reform
    • EdTech Startups & Businesses
    • Higher Education EdTech
    • Online Learning & eLearning
    • Parent & Family Tech
    • Personalized Learning
    • Product Reviews
  • Advertise
  • Tech Edvocate Awards
  • The Edvocate
  • Pedagogue
  • School Ratings
  • The Shocking Truth: ESG Training Programs Are Quietly Reshaping Your Career Path

  • Why Millions of People Are Switching to These Green Energy Certifications Right Now

  • The green skills gap in 2026: How to address this growing problem

  • The Shocking Truth: Your Degree Won’t Land You the Best IT Jobs in 2026

  • The Brutal Truth About Degrees: Why Micro-Credentials Are Quietly Dominating Careers by 2026

  • Why 96% of Employers Now Prefer Skills Over Degrees: The Micro-Credential Revolution

  • This Crucial Mistake With AI Is Stunting Student Minds: Here’s How to Fix It

  • The AI ‘Cognitive Surrender’ Crisis: 7 Tools Every Educator Needs NOW

  • This Crucial Mistake Is Quietly Killing Students’ Brains, Says MIT

  • The Sneaky Truth About RTO: How to Negotiate Flexible Work Without Losing Your Job

Assistive Technology
Home›Assistive Technology›How to Install BLTouch Sensor in Ender-3 V2 for Auto Bed Leveling

How to Install BLTouch Sensor in Ender-3 V2 for Auto Bed Leveling
By Matthew Lynch
June 11, 2023
0
Spread the love

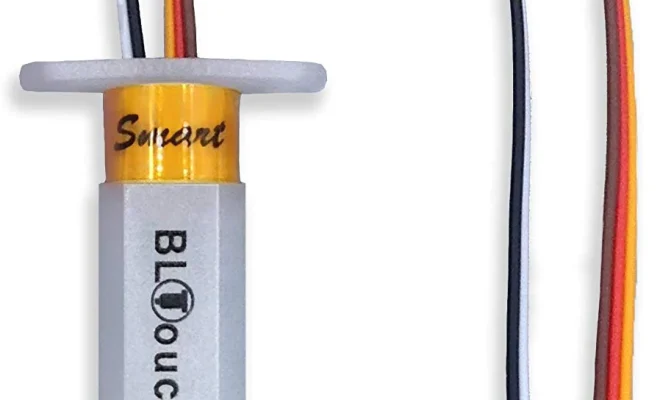
The BLTouch sensor is an accessory that can be added to your Ender-3 V2 3D printer to help automate the leveling process of your print bed. This is a great upgrade that saves time and effort when setting up for a print job. In this article, we will go through the steps to install the BLTouch sensor to your Ender-3 V2 for auto bed leveling.

Step 1: Gather Materials

Before installing the BLTouch sensor on your Ender-3 V2, you need to gather the required materials. You will need:

– BLTouch sensor
– Extension cable
– Mounting bracket
– Zip ties
– Screws
– Screwdriver
– Allen wrench
– Electrical tape

Step 2: Remove the Stock Z-Endstop

First, you need to remove the stock Z-endstop from the printer. The Z-endstop is located on the side of the extruder carriage near the top. You will need to remove the two screws that hold it in place using an Allen wrench.

Step 3: Install the Mounting Bracket

Next, install the mounting bracket for the BLTouch sensor. The mounting bracket will fit on the same two screws used to hold the Z-endstop in place. Use the same Allen wrench to secure the bracket to the extruder carriage.

Step 4: Connect the BLTouch Sensor

Now you need to connect the BLTouch sensor to the extension cable. One end of the extension cable will connect to the BLTouch sensor, and the other end will connect to the motherboard. Make sure to connect the wires correctly to avoid damaging the sensor.

Step 5: Mount the BLTouch Sensor

Next, mount the BLTouch sensor to the mounting bracket using the screws provided. The sensor should be installed at a height where it is just barely touching the print bed.

Step 6: Route the Cable

Now you need to route the extension cable from the BLTouch sensor to the motherboard. You can use zip ties to secure the cable along the frame of the printer.

Step 7: Connect to Motherboard

Finally, connect the extension cable to the motherboard. The motherboard has a labeled connector for the BLTouch sensor. Make sure to connect the wires correctly to avoid damaging the motherboard.

Step 8: Test and Adjust

Once you have completed the installation, you can turn on the printer and test the BLTouch sensor. The sensor should detect the print bed and adjust the nozzle height accordingly. It is a good idea to adjust the settings in the firmware to fine-tune the sensor’s performance.

In conclusion, installing the BLTouch sensor to your Ender-3 V2 for auto bed leveling is a great way to save time and effort when setting up for a print job. The steps mentioned in this article will help you install the BLTouch sensor correctly, ensuring that it works correctly and helps you achieve great results with your 3D printing.


Previous Article

How to Link Roomba to Google Home

Next Article

LINE vs. WhatsApp

Matthew Lynch

Related articles More from author

  • Assistive Technology

    How to Change DNS Server Settings

    June 15, 2023
    By Matthew Lynch
  • Assistive Technology

    How to Turn Off Subtitles on Amazon Prime Video

    June 8, 2023
    By Matthew Lynch
  • Assistive Technology

    How to Use the INDEX and MATCH Function in Excel

    June 11, 2023
    By Matthew Lynch
  • Assistive Technology

    How to Access Twitter’s Onion Service via Tor

    June 12, 2023
    By Matthew Lynch
  • Assistive Technology

    How to Set Up a YouTube Premium Family

    June 11, 2023
    By Matthew Lynch
  • Assistive Technology

    How to Install In-Wall Stereo Speakers

    June 12, 2023
    By Matthew Lynch

Search

Login & Registration

  • Log in
  • Entries feed
  • Comments feed
  • WordPress.org

Newsletter

Signup for The Tech Edvocate Newsletter and have the latest in EdTech news and opinion delivered to your email address!

About Us

Since technology is not going anywhere and does more good than harm, adapting is the best course of action. That is where The Tech Edvocate comes in. We plan to cover the PreK-12 and Higher Education EdTech sectors and provide our readers with the latest news and opinion on the subject. From time to time, I will invite other voices to weigh in on important issues in EdTech. We hope to provide a well-rounded, multi-faceted look at the past, present, the future of EdTech in the US and internationally.

We started this journey back in June 2016, and we plan to continue it for many more years to come. I hope that you will join us in this discussion of the past, present and future of EdTech and lend your own insight to the issues that are discussed.

Newsletter

Signup for The Tech Edvocate Newsletter and have the latest in EdTech news and opinion delivered to your email address!

Contact Us

The Tech Edvocate
910 Goddin Street
Richmond, VA 23231
(601) 630-5238
[email protected]

Copyright © 2026 Matthew Lynch. All rights reserved.