How to do French manicure
“`html
When it comes to classic nail designs, the French manicure remains a timeless favorite. This elegant style, characterized by its clean lines and understated beauty, has graced the fingers of fashion icons and everyday individuals alike for decades. But do you know how to achieve this chic look at home? In this comprehensive French manicure tutorial, we’ll break down everything you need to know, from essential tools to step-by-step instructions and tips for perfection.
1. The History of the French Manicure
The French manicure’s roots can be traced back to the 18th century, where it was popular among French aristocrats. However, it gained widespread popularity in the 1970s, largely due to the efforts of nail technician Jeff Pink. Pink, the founder of ORLY, created the look for a fashion show in Paris, aiming to provide models with a versatile, natural look that complemented various outfits. Since then, the French manicure has become a staple in salons around the world and a go-to style for many.
Unlike many nail trends, the French manicure’s appeal lies in its simplicity and elegance. It offers a fresh, clean appearance that can be worn for any occasion, from casual outings to formal events. This adaptability has solidified its place in the nail art canon, making it a must-know skill for both amateur and professional nail enthusiasts.
2. Essential Tools for a French Manicure
Before you begin your French manicure tutorial, it’s crucial to gather the right tools. Having the right supplies on hand not only makes the process smoother but also enhances the final result. Here’s a list of essentials you’ll need:
- Nail Clippers: To shape your nails before applying polish.
- Nail File: For refining the edges and smoothing the tips.
- Nail Buffer: To create a smooth surface for polish application.
- Base Coat: To protect your nails and ensure polish adherence.
- White Nail Polish: For the tips; a classic French look uses pure white, but you can also opt for soft pastels.
- Sheer Pink or Nude Polish: For the base color that provides a natural look.
- Top Coat: To seal your design and add shine.
- Striping Brush or Tape: Optional tools for creating clean lines.
- Cotton Balls and Nail Polish Remover: For correcting mistakes.
Having all your supplies ready makes the process less stressful and more enjoyable. It’s a good practice to set up a clean workspace where you can comfortably apply your manicure.
3. Step-by-Step French Manicure Tutorial
Ready to get started? Follow these detailed steps for a flawless French manicure:
- Prepare Your Nails: Begin by removing any old polish with nail polish remover. Clip your nails to your desired length, then file and buff to create a smooth surface.
- Apply Base Coat: Apply a thin layer of base coat to protect your nails and help your polish adhere better. Allow it to dry completely.
- Paint the Base Color: Using your sheer pink or nude polish, apply one or two coats to the entire nail, making sure to get an even coverage. Allow the base color to dry.
- Create the Tips: For traditional French tips, use the white polish. You can either freehand the tips using a small brush or use tape for a more precise application. If you’re using tape, apply it to the nail so that only the tip is exposed, then paint over the exposed area with white polish. Remove the tape quickly to avoid smudging.
- Clean Up Edges: If you’ve made any mistakes, dip a small brush or cotton swab in nail polish remover and gently clean up the edges around your nails.
- Apply Top Coat: Once the white polish is completely dry, add a top coat to seal your manicure and give it a glossy finish. This will also help prevent chipping.
- Final Touches: Allow your nails to dry completely. For extra care, apply cuticle oil around the nail beds.
And there you have it! Your very own French manicure, reflecting both elegance and style.
4. Tips for a Perfect French Manicure
While the steps above are straightforward, achieving a perfect French manicure can take some practice. Here are some tips to help you elevate your results: (See: History and types of nail polish.)
- Choose the Right Colors: Selecting complementary shades for the base and tip colors can significantly impact your overall look. Experiment with different shades of pinks and whites, or try colored tips for a modern twist.
- Thin Coats: Apply your polish in thin layers. Thick layers may lead to uneven drying and bubbling.
- Use a Good Quality Polish: Investing in high-quality nail polish can make a difference in the finish and longevity of your manicure.
- Practice Makes Perfect: If you’re new to nail art, don’t be discouraged by imperfections. The more you practice, the better your technique will become.
- Take Your Time: Rushing through the process can lead to mistakes. Allow adequate drying time between each coat for the best results.
Remember, it’s all about finding what works best for you. Don’t be afraid to make adjustments based on your preferences and nail type.
5. Common Mistakes to Avoid
Even seasoned nail enthusiasts can fall prey to some common pitfalls when doing a French manicure. Acknowledging these mistakes can save you time and frustration:
- Uneven Tips: One of the most noticeable mistakes is uneven tips. Use a steady hand and, if needed, a guide to help create uniform lines.
- Skipping the Base Coat: Neglecting to use a base coat can lead to staining and poor polish adherence. Never skip this essential step.
- Not Cleaning Your Brush: If you use a brush for the white tips, ensure it’s clean from any previous colors to avoid mixing. This ensures a crisp, clean line.
- Forgetting the Top Coat: A top coat is crucial for sealing your manicure and adding shine. Skipping this step can result in a dull finish and more chips.
Avoiding these mistakes will enhance the quality of your French manicure and make your efforts more rewarding.
6. Variations of the French Manicure
For those looking to switch things up, there are numerous variations of the traditional French manicure that can add a modern twist. Here are some popular styles:
- Colored Tips: Instead of the classic white, try using vibrant colors for an upbeat look. Colors like neon pink, blue, or metallics can create a fun and trendy effect.
- Reverse French Manicure: This style inverts the traditional design by painting the base of the nail instead of the tips, giving a unique appearance.
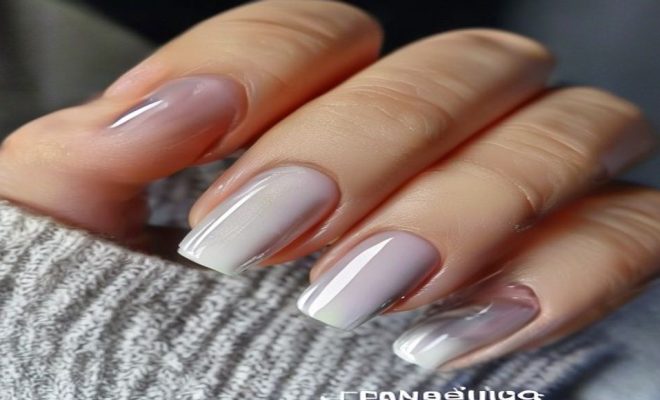
- Ombre French Manicure: Blending two colors for the tips creates an ombre effect, transitioning from one hue to another for a softer look.
- Glitter Tips: Adding glitter to the tips can elevate your manicure for special events, giving it a festive touch.
These variations allow you to show off your creativity while still enjoying the elegance of the French manicure.
7. Maintaining Your French Manicure
Once you’ve achieved the perfect French manicure, you’ll want to maintain its beauty for as long as possible. Here are some maintenance tips:
- Avoid Harsh Chemicals: Protect your nails by avoiding harsh cleaning products and wear gloves when washing dishes or cleaning.
- Moisturize: Keep your hands and cuticles moisturized to prevent dryness and cracking.
- Touch Up Chips: If you notice any chips, use your white polish to touch up the tips and reapply the top coat.
- Regular Maintenance: Schedule regular manicures to keep your nails in pristine condition and to maintain your desired length.
With proper care, your French manicure can last anywhere from a week to two weeks before needing a touch-up.
8. The French Manicure in Today’s Fashion
As we move into the modern fashion era, the French manicure continues to be relevant. Influencers and celebrities frequently showcase this classic style, often putting their own spin on it. The beauty industry has embraced the French manicure, adding it to seasonal trends and collaborations with high-fashion brands. Designers have incorporated French manicures into their runway looks, proving that this style can transcend time and trends.
Additionally, many nail salons have started offering unique takes on the French manicure, integrating nail art techniques like decals, jewels, and intricate designs alongside the classic look. This evolution reflects a broader trend in nail fashion that values personalization and self-expression.
9. Frequently Asked Questions (FAQ)
What nail shapes work best for a French manicure?
The traditional French manicure looks great on most nail shapes. However, almond and square shapes are particularly popular because they showcase the clean lines of the tips beautifully. Round nails can also benefit from the style but may require a more curved application of the white polish. (See: Nail salon health and safety guidelines.)
Can I do a French manicure with gel polish?
Absolutely! A gel French manicure can provide a longer-lasting finish compared to traditional nail polish. Just follow the same steps as you would for a regular manicure. After applying the base color, cure it under a UV or LED lamp before adding the tips and top coat. The result will be a durable and glossy finish.
How can I remove a French manicure without damaging my nails?
To safely remove a French manicure, soak a cotton ball in acetone or a non-acetone nail polish remover and place it on your nail. Wrap each finger in aluminum foil to keep the cotton in place and let it sit for about 10-15 minutes. After soaking, gently push off the polish with an orange stick or a cuticle pusher. Avoid pulling or scraping, as this can damage your natural nails.
What if I don’t have a steady hand for painting the tips?
If you’re worried about your hand’s steadiness, you can use striping tape to help create clean lines for the tips. Simply place the tape along the edge of the nail in the shape you desire, paint, and then carefully remove the tape. Alternatively, using a small brush or a dotting tool can also help in making precise applications.
How do I keep my French manicure looking fresh for longer?
To maintain the freshness of your French manicure, apply a top coat every few days to seal and protect your polish. Additionally, keep your hands moisturized and avoid using your nails as tools to prevent chips and breakage. Wearing gloves while doing household chores can also prolong the life of your manicure.
10. Exploring Celebrity French Manicures
Many celebrities have made the French manicure their signature look, adding flair and style to this classic design. For instance, stars like Jennifer Aniston and Bella Hadid often sport French tips, showcasing how versatile the design can be. They demonstrate that this style can be adapted to fit various fashion aesthetics, from minimalist chic to glam and glitzy.
Moreover, during the 2021 Met Gala, several attendees opted for modern interpretations of the French manicure, incorporating intricate nail art and bold colors that redefined the classic look. This evolution signifies that the French manicure is not just a trend but also a canvas for creative expression.
11. Final Thoughts: Your Turn to Shine
Mastering the French manicure is a rewarding skill that enhances your nail art repertoire. With this French manicure tutorial, you’re now equipped with the knowledge and confidence to create a beautiful, classic look at home. Whether you stick to the traditional style or explore contemporary variations, the French manicure remains a versatile choice for anyone looking to elevate their nail game. Dive into this art of elegance and let your nails shine! (See: Research on nail care and health.)
12. Understanding Nail Health: Preparing for Your French Manicure
Before diving into the artistry of a French manicure, it’s important to consider the health of your nails. Healthy nails not only make your manicure look better but also can make the process easier and more enjoyable. Here are some pointers to ensure your nails are in prime condition before you start:
- Nail Strengtheners: Consider using a nail strengthener if you have weak or brittle nails. These products help fortify your nails, reducing the risk of breakage during the manicure process.
- Hydration: Just like your skin, your nails and cuticles need moisture. Regularly apply cuticle oil to keep your cuticles hydrated and promote nail growth.
- Regular Trimming: Keeping your nails at a manageable length not only prevents breakage but also helps in achieving a more polished look. Trim your nails regularly to maintain your desired shape.
- Diet Matters: What you eat plays a significant role in the health of your nails. Foods rich in biotin, vitamin E, and protein can help promote stronger, healthier nails.
Taking care of your nails will not only enhance your French manicure experience but will also ensure that your nails look stunning in the long run.
13. Trending French Manicure Styles
The French manicure isn’t just a classic; it’s also continuously evolving with new trends. Keeping up with the latest styles can give your manicure a fresh twist. Here are some trending styles to consider:
- Negative Space French Manicure: This modern take on the classic features an unpainted section on the nail, creating an artistic effect. It’s achieved by leaving a portion of the nail bare, often with a unique shape at the tip.
- Floral French Manicure: Add small floral designs or stickers to enhance the classic look of the French tips. This can create a playful and feminine touch that’s perfect for spring.
- Abstract French Manicure: Mixing geometric shapes and multiple colors with traditional tips provides an avant-garde style. This trend emphasizes creativity and personal expression in nail art.
- Matte French Manicure: Instead of the usual glossy finish, a matte top coat can give the French manicure a chic, modern twist. Pairing matte colors with shiny tips adds depth to the overall look.
Experimenting with these trends can help you personalize your French manicure and showcase your unique style.
14. DIY French Manicure Kits: What to Look For
If you prefer a more guided approach, consider investing in a DIY French manicure kit. These kits typically come with all the essential tools and products, making it easy to achieve the look with confidence. Here’s what to look for when selecting a kit:
- Quality Polish: Ensure the kit includes high-quality nail polishes that are less likely to chip and provide a smooth finish.
- Easy Application Tools: Look for kits that provide striping brushes or guides, which can help you achieve the perfect tips without hassle.
- Comprehensive Instructions: A good kit should come with clear instructions on how to use each product, ensuring you get the best results.
- Variety of Colors: Some kits offer multiple shades for base and tip colors. This allows you to experiment and find the combination that suits you best.
Using a DIY kit can simplify the process and give beginners a better chance at achieving a salon-quality French manicure at home.
“`
Trending Now
Frequently Asked Questions
What is a French manicure?
A French manicure is a classic nail design characterized by a natural-looking base with white tips. It is known for its elegant and timeless appeal, making it suitable for various occasions, from casual outings to formal events.
What tools do I need for a French manicure?
To achieve a French manicure at home, you will need nail clippers, a nail file, a nail buffer, a base coat, and white nail polish for the tips. These tools ensure a polished and professional finish.
How do I apply a French manicure at home?
To apply a French manicure, start by shaping your nails with clippers and a file, then buff the surface. Apply a base coat, followed by white polish on the tips. Finish with a top coat for durability and shine.
What is the history of the French manicure?
The French manicure dates back to the 18th century, gaining popularity in the 1970s thanks to nail technician Jeff Pink. He created the look to provide models with a versatile style that complemented various outfits during a Paris fashion show.
Can a French manicure be done on short nails?
Yes, a French manicure can be done on short nails. The clean lines and simple design enhance the natural beauty of short nails, making them appear well-groomed and stylish.
What did we miss? Let us know in the comments and join the conversation.