3 Ways to Write on Easter Eggs

Easter is a time for celebration, and one of the most cherished traditions is decorating eggs. Writing messages or creating designs on your Easter eggs adds a personal touch to the decor. There are various techniques you can use to achieve unique and beautiful results. In this article, we will discuss three different ways to write on Easter eggs that will bring out the creativity within everyone.
1. Dye and Wax Techniques
A traditional method for inscribing messages on Easter eggs is to use dye and wax. For this technique, you need the following supplies:
– White eggs
– A pencil
– White crayons or paraffin wax
– Food coloring or egg dye kits
– A bowl of warm water
First, sketch your desired pattern or message on an egg in pencil. Next, use the white crayon or a small tool dipped in melted wax to trace the design. This wax layer will protect the images and words from the coloring process. Finally, mix your chosen color with some warm water and dip the egg into it. Let it rest for a few minutes before taking it out and carefully wiping off any excess dye. The result is a beautifully decorated egg with legible text protected by the wax.
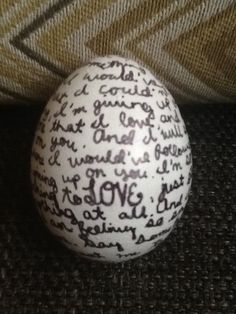
2. Hand Lettering with Permanent Markers
For those who have steady hands and artistic inclinations, hand lettering with permanent markers is an excellent way to write on Easter eggs. This method allows for more precision in line width and detail. Gather these supplies:
– White or brown eggs
– Permanent markers in various colors
– Acrylic paint (optional)
Start by choosing a style of lettering that suits your personal taste (e.g., modern calligraphy, cursive script, or bold print). Then, practice your penmanship on paper until you feel comfortable drawing your message directly onto an egg’s surface. Once ready, carefully write out your message using permanent markers. Note that you can also use acrylic paint to create additional details, designs, and images.
3. Temporary Tattoos or Decals
If you’re not confident in your drawing abilities or lack the time to create intricate handwritten designs on Easter eggs, temporary tattoos or decals are your best bet. You’ll need:
– Plain eggs (white or brown shell)
– Temporary tattoos or decals
– Scissors
– A sponge or cloth
– Warm water (for tattoos)
Choose temporary tattoos or decals featuring various designs and lettering styles. Cut out the desired design with a pair of scissors and lightly moisten the back of it with a sponge dipped in warm water for a few seconds. Then, carefully place the tattoo or decal onto the egg and hold it in position for about 30 seconds (or as directed by the manufacturer). Slowly peel away the paper backing, revealing a beautifully designed egg with a clear, legible message.
Easter egg decorating is an age-old tradition that brings joy and entertainment to all ages. By using these three methods, you can create personalized messages and designs on your Easter eggs that will add beauty and meaning to your celebrations. Happy decorating!


