Master the Dutch Braid: An Easy Step-by-Step Tutorial
“`html
When it comes to versatile hairstyles, the dutch braid stands out as a classic choice that can be both elegant and practical. Whether you’re dressing up for a formal occasion or just looking for a stylish way to manage your hair on a casual day, mastering the dutch braid can elevate your look effortlessly. This dutch braid tutorial is designed to guide you through the steps, provide some background knowledge, and offer tips for making the process as smooth as possible.
1. Understanding the Dutch Braid
The dutch braid is often referred to as an inside-out braid, and it’s distinguishable from the traditional braid due to its unique formation. While a regular braid weaves the strands over each other, the dutch braid weaves them underneath, creating a three-dimensional effect that pops against the scalp. This technique not only adds volume but also provides a more textured and intricate appearance.
A dutch braid is versatile; it can be styled as a single braid or incorporated into more complex hairstyles, like a crown or fishtail braid. Its origins trace back to the Dutch culture, where it has been a popular choice for centuries. The beauty of the dutch braid lies in its adaptability, making it perfect for any hair type and length.
2. Tools and Preparations
Before diving into your dutch braid tutorial, it’s essential to gather the necessary tools. Here’s a concise list:
- Hairbrush or comb: Ensure your hair is tangle-free for a smoother braiding experience.
- Hair ties: Opt for small, clear elastics or matching hair ties to secure the braid.
- Hair spray or styling gel: These can help keep flyaways in check and enhance the braid’s longevity.
- Optional accessories: Consider decorative pins or ribbons to personalize your braid.
Preparation is key. Start with clean, dry hair. While you can braid damp hair, a dry texture makes it easier to manage. If your hair is naturally straight or fine, you might want to add some texturizing spray or mousse to give it grip. For thicker or curly hair, consider using a smoothing product to prevent tangles.
3. Step-by-Step Guide to Dutch Braiding
Now that you have your tools ready, let’s get into the step-by-step process of creating a dutch braid:
- Section Your Hair: Start by parting your hair down the middle or to one side, depending on your preference. Gather a section of hair from the top of your head, roughly the size of a rectangle, and split it into three equal strands.
- Begin Braiding: Just like a traditional braid, start by crossing the right strand under the middle strand, then cross the left strand under the new middle strand. This forms the base of your dutch braid.
- Incorporate More Hair: As you continue braiding, add small sections of hair from both sides of your head into the strands you’re crossing. Remember, each time you pull a new section into the braid, you need to keep crossing underneath to maintain the dutch braid format.
- Continue Down the Length: Repeat the process until you reach the nape of your neck. Make sure to keep the tension consistent throughout the braid for a neat finish.
- Secure the Braid: Once you reach the end of your hair, finish with a regular three-strand braid for a few inches before securing it with a hair tie.
- Tighten and Adjust: Gently tug at the edges of the braid to create a fuller look. Be careful not to pull too hard, or the braid may come undone.
Congratulations! You’ve just completed your first dutch braid. This method can be repeated for a second braid on the opposite side or transformed into a crown braid for a more intricate style.
4. Common Mistakes and How to Avoid Them
Even with a solid dutch braid tutorial, it’s easy to encounter some hiccups along the way. Here are a few common mistakes and how to steer clear of them:
- Ineven Sections: If the three strands are not equal in size, the braid may look lopsided or messy. Take your time when separating the strands to ensure they’re proportional.
- Too Much Tension: While you want the braid to be tight enough for stability, overtightening can lead to discomfort and may cause the hair to break. Find a balance between firm and loose.
- Forgetting to Add Hair: A dutch braid requires incorporating hair as you go, unlike a traditional braid. If you forget to add hair, you may inadvertently end up with a different braid style.
Practice is vital. The more you braid, the more comfortable and skilled you’ll become. Don’t get discouraged by initial challenges; they’re part of the learning process.
5. Styling Variations
Once you’ve mastered the basic dutch braid, you might want to experiment with various styles. Here are several popular variations: (See: Learn about different types of braids.)
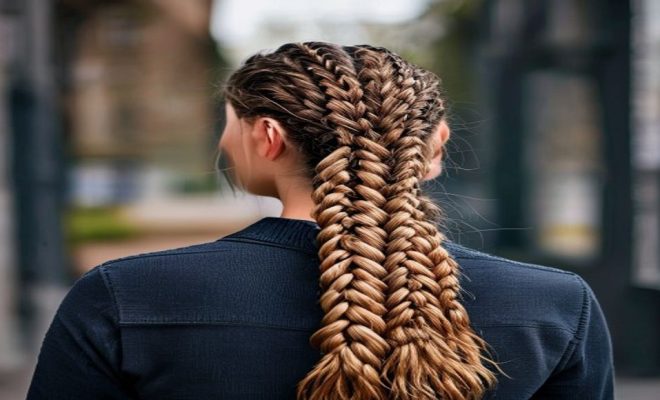
- Double Dutch Braid: Similar to the single braid, but instead, you create two braids on either side of your head. This style is edgy and fun!
- Dutch Braid Crown: After creating two dutch braids, wrap them around your head and secure them with pins for a stunning crown effect.
- Fishtail Dutch Braid: This combines the technique of a dutch braid with a fishtail braid for a unique twist. It involves adding smaller sections of hair, resulting in a more intricate pattern.
These variations can be integrated into different hairstyles, allowing for endless creativity. Consider adding accessories like decorative clips or floral embellishments to make your look pop.
6. Hair Types and Dutch Braiding
One of the beautiful aspects of the dutch braid is its adaptability to various hair types. Here’s how different textures and lengths can affect your styling:
- Straight Hair: This type generally holds the braid well, allowing for clean edges. If your hair is fine, use a volumizing product for added texture.
- Curly Hair: Braiding can be a little trickier with curls, but it’s certainly doable! Ensure your hair is well-moisturized and consider using a curl cream for better manageability.
- Thick Hair: Those with thick hair may find it easier to create a dutch braid due to the volume. However, it’s critical to section carefully, as large clumps can lead to unevenness.
- Short Hair: Even if your hair is on the shorter side, you can still rock a dutch braid! Just focus on the front sections, and secure them back to create an elegant half-up style.
Understanding how your hair type interacts with the braiding process can enhance the final look and make the technique easier to execute.
7. Current Trends and Cultural Significance
The dutch braid isn’t just a hairstyle; it’s a cultural phenomenon that has evolved throughout the years. In recent fashion trends, the dutch braid has seen a resurgence, particularly among celebrities and influencers who showcase it on various platforms. From Instagram to TikTok, tutorials abound, making it accessible for everyone.
Additionally, the dutch braid carries cultural significance in various communities, often symbolizing femininity and artistry. Many styles of braiding have historical roots in different cultures; the dutch braid is no exception. Understanding its origins can add depth to the styling experience and promote appreciation for this timeless technique.
8. Frequently Asked Questions
What is the difference between a dutch braid and a french braid?
The primary difference lies in how the hair is woven. In a dutch braid, the strands are crossed under each other, giving it a raised look, while in a french braid, the strands are crossed over one another, resulting in a flatter appearance. The dutch braid is often preferred for its 3D effect and volume.
Can I do a dutch braid on wet hair?
While it’s possible to braid wet hair, it’s generally easier to work with dry hair. Wet hair can be slippery or hard to manage, making it difficult to achieve a tight, neat braid. If you do choose to braid wet hair, consider using a non-slip styling product for better control.
How long does a dutch braid typically last?
The longevity of a dutch braid depends on hair type, the tightness of the braid, and environmental factors. Generally, a well-done dutch braid can last several hours to a full day. Using hair spray or a light styling gel can help keep your braid in place longer.
Can I use accessories with my dutch braid?
Absolutely! Accessories can enhance the look of your dutch braid. Try adding decorative pins, ribbons, or even flowers to personalize your style. Just make sure they’re securely placed to avoid them falling out during the day.
Is it difficult to learn how to do a dutch braid?
Learning to dutch braid may take a bit of practice, especially if you’re new to braiding. However, with patience and persistence, you can master it! Following tutorials, like this one, and practicing regularly can significantly speed up the learning process.
9. Conclusion
As you can see, the dutch braid is more than just a hairstyle; it’s a skill that can be refined with practice and experimentation. Whether you’re looking to incorporate it into your daily routine or save it for special occasions, this dutch braid tutorial equips you with the know-how to create beautiful styles. Don’t be afraid to add your flair and personalize your braids!
10. Final Tips for Success
Before you grab your hairbrush and dive into braiding, here are a few final tips that can help you along the way: (See: Understanding the importance of hair care.)
- Practice Regularly: Just like any skill, the more you practice, the better you’ll become. Don’t hesitate to try different styles and techniques.
- Watch Video Tutorials: Sometimes, seeing the process in action can provide clarity. Many beauty influencers offer in-depth tutorials that can complement this guide.
- Be Patient: Don’t rush the process. Take your time, and enjoy the creativity that comes from braiding your hair.
With these tips and techniques at your disposal, you’re well on your way to becoming a dutch braid expert. Happy braiding!
11. Advanced Techniques for the Ambitious Braider
If you’re feeling confident with your basic dutch braid skills, you might want to explore some advanced techniques that can take your braiding to the next level. Here are a few ideas to get you started:
- Reverse Dutch Braid: This technique involves starting from the nape of the neck and working your way up, creating a striking look that’s quite different from the traditional approach.
- Dutch Lace Braid: This variation incorporates lace braiding techniques, where only one side of the braid adds in hair. This creates a beautiful, delicate effect that can be perfect for special occasions.
- Waterfall Dutch Braid: This fun spin on the dutch braid allows you to let sections of hair fall out as you braid, creating a cascading look that’s ideal for formal events.
These advanced braiding techniques might take a little more time and practice to perfect, but they can really set your styling apart and give you a unique edge in your hairstyle collection.
12. Incorporating Dutch Braids into Everyday Styles
One of the best things about the dutch braid is its versatility. Here are some creative ways to incorporate dutch braids into your everyday styles:
- Half-Up Dutch Braid: This style combines a small dutch braid with the rest of your hair left down. It’s perfect for a casual day out or a laid-back office look.
- Dutch Braid Ponytail: After creating a dutch braid, simply secure the rest of your hair into a ponytail. This combo is both chic and practical.
- Accessorized Dutch Braid: Use colorful hair ties, clips, or ribbons in your dutch braid for a thematic look, whether it’s for a holiday, festival, or just a fun day out with friends.
With these ideas, you can make your dutch braid a staple in your hair routine, giving you an effortless way to elevate your everyday look.
13. How to Care for Your Hair Post-Braid
After you’ve enjoyed your dutch braid, it’s important to give your hair some love. Here are a few care tips:
- Gentle Removal: When taking out your braid, do so gently to avoid breakage. If you notice tangles, use a detangling spray to ease the process.
- Moisturize: Braiding can sometimes lead to dryness. Use a nourishing hair oil or leave-in conditioner to keep your hair healthy and hydrated.
- Regular Trims: Keeping your hair trimmed will help minimize split ends and maintain its overall health, making braiding easier in the long run.
By caring for your hair after braiding, you ensure it stays strong and healthy, ready for your next styling adventure.
14. Inspiration from Celebrities
Looking for a little inspiration? Many celebrities have embraced the dutch braid and put their unique spin on it. For instance, Jessica Alba is often seen sporting a stylish dutch braid paired with casual outfits, while Katy Perry has been known to flaunt intricate variations, incorporating colorful hair extensions. You can also take notes from runway models who sport dutch braids, often styled along with other trends such as bohemian or street-style looks. Following these icons on social media can provide you with ideas on how to incorporate dutch braids into your own wardrobe and style.
15. Fashion Events and Dutch Braids
Fashion events are a showcase for the latest trends, including hairstyles. At major fashion weeks, dutch braids have made appearances on the runway, often styled in innovative ways that captivate audiences. Designers often utilize hair stylists who create unique interpretations of the dutch braid, mixing it with other elements like curls or waves, or using accessories that elevate the overall look. Keeping an eye on these events can inspire your own styling choices and perhaps lead you to try out a fresh twist on this timeless braid.
16. Beginner’s Troubleshooting Guide
If you’re just starting to learn how to dutch braid, you may run into some challenges. Here’s a handy troubleshooting guide to help you navigate some common issues: (See: Explore hair braiding trends and styles.)
- Braid Slips Out: If your braid keeps unraveling, it could be due to slick hair or not having enough tension. Try using a texturizing spray before you braid to add grip and ensure your sections are tight enough.
- Uneven Braid: If one side of your braid looks thicker than the other, remember to regularly check the size of the sections you are adding. Keeping your sections uniform will lead to a balanced braid.
- Difficulty Incorporating Hair: If you struggle to add hair smoothly, practice on smaller sections first. As you get comfortable, gradually increase the size of the sections you incorporate until you feel confident.
Being aware of these common issues can help you refine your technique and build confidence in your braiding skills.
17. FAQs About Dutch Braids
Can I style my dutch braid differently for special occasions?
Absolutely! For special occasions, consider embellishing your dutch braid with elegant accessories, such as jeweled pins or fresh flowers. You could also try a more complex style like a dutch braid updo for a sophisticated look.
Are there any specific hair care routines that can help with braiding?
Yes, maintaining healthy hair is crucial for easier braiding. Regular deep conditioning treatments, a balanced diet rich in vitamins and minerals, and minimizing heat styling can all contribute to healthier hair, making braids easier to manage.
How do I transition from a dutch braid to a different hairstyle?
If you want to switch from a dutch braid to another style, you can easily do this by removing the braid and transitioning into loose waves or a ponytail. Using a curling wand can add texture, or you can smooth it down for a sleek look.
Is the dutch braid suitable for all occasions?
Definitely! The dutch braid is incredibly versatile. You can dress it up for formal events or keep it casual for everyday errands. Its adaptability is one of the reasons it remains a popular choice among various hairstyles.
How can I make my dutch braid look more voluminous?
To achieve a fuller look, gently pull on the edges of the braid after securing it to loosen the sections slightly. You can also use a volumizing mousse or powder before braiding to create more texture and lift at the roots.
18. Final Thoughts on Mastering the Dutch Braid
Mastering the dutch braid opens up a world of hairstyling opportunities. It’s a skill that not only enhances your look but also allows you to express your creativity. With practice and experimentation, you can create stunning styles that suit any occasion. As you continue to explore different variations and techniques, remember to have fun and enjoy the process. Happy braiding!
“`
Trending Now
Frequently Asked Questions
What is a Dutch braid?
A Dutch braid, often called an inside-out braid, is a hairstyle where the hair strands are woven underneath each other, creating a three-dimensional effect. This technique adds volume and a textured appearance, making it a versatile choice for various occasions and hair types.
How do I prepare my hair for a Dutch braid?
To prepare for a Dutch braid, start with clean, dry hair to ensure easier management. Use a hairbrush or comb to remove any tangles, and gather necessary tools like hair ties and styling products to keep the braid neat and secure.
What tools do I need for a Dutch braid?
For a Dutch braid, you will need a hairbrush or comb to detangle your hair, hair ties to secure the braid, and optional styling products like hairspray or gel to manage flyaways and enhance the braid's longevity.
Can I style a Dutch braid on any hair type?
Yes, the Dutch braid is adaptable and can be styled on various hair types and lengths. Whether you have straight, wavy, or curly hair, this braid can be customized to suit your individual style.
What occasions are suitable for a Dutch braid?
A Dutch braid is versatile and suitable for both formal and casual occasions. It can elevate your look for events like weddings or parties, while also serving as a practical hairstyle for everyday wear.
What's your take on this? Share your thoughts in the comments below — we read every one.