How to Recover BitLocker: 13 Steps
BitLocker is a security feature integrated into Windows that serves to encrypt your hard drive, protecting your valuable data from unauthorized access and potential data breaches. However, there may be times when you would need to recover BitLocker-protected data, especially in cases of forgotten passwords or corrupted drives. This step-by-step guide will show you how to recover data from a BitLocker-encrypted drive.
Step 1: Prepare the Necessary Materials
Ensure that you have the following items ready before starting the recovery process:
– The device with the BitLocker-encrypted drive
– A Windows installation or recovery USB drive
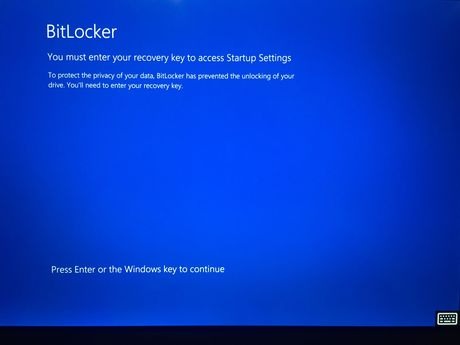
– Your BitLocker recovery key (if available) or any other backup means containing the key
Step 2: Enable the BIOS/UEFI Boot Order
Reboot your computer and enter BIOS/UEFI settings. Change the boot order to boot from USB, CD/DVD, or any other external media where your Windows installation media is located.
Step 3: Restart Your Computer
Save the changes made in the BIOS/UEFI settings and reboot your computer.
Step 4: Access Windows Setup Screen
Connect your external media containing Windows installation files to your computer. Wait for the “Press any key to boot from CD or DVD” message and press any key.
Step 5: Choose Language and Region Settings
Select the appropriate language, time and currency format, and keyboard input method on the Windows etup screen.
Step 6: Click “Repair Your Computer”
Click on “Next” followed by “Repair Your Computer” located in the bottom-left corner.
Step 7: Access Advanced Startup Options
On the “Choose an option” screen, click on “Troubleshoot” then click “Advanced Options.”
Step 8: Launch Command Prompt
On the next screen, click “Command Prompt.”
Step 9: Unlock BitLocker-protected Drive
Type the following command into the Command Prompt:
“manage-bde -unlock X: -RecoveryPassword YOUR-BITLOCKER-RECOVERY-KEY”
Replace “X:” with the drive letter of your BitLocker-protected drive and replace “YOUR-BITLOCKER-RECOVERY-KEY” with your own recovery key.
Step 10: Validate Drive Unlocking
If you entered the recovery key accurately, a message will appear that says “The password successfully unlocked volume X:.”
Step 11: Disable BitLocker
Type the following command to disable BitLocker on the unlocked drive:
“manage-bde -off X:”
Replace “X:” with the drive letter of your unlocked drive.
Step 12: Exit Command Prompt
Once you see a message confirming that decryption is in progress, type “exit” to close the Command Prompt.
Step 13: Restart Your Computer
Restart your computer. It may take some time for the decryption process to complete. After that, you should be able to access your data on the formerly BitLocker-encrypted drive.
If these steps are followed correctly and all necessary information is available, you should be able to recover BitLocker without any complications. Remember to backup your sensitive data regularly, and keep your recovery key in a safe location.